Virtual menus are customizable on-screen menus controlled by selected inputs on your Steam Controller. While most commonly used with the trackpads, in some cases they can also be enabled with a thumbstick, the directional pad, button pads, or gyro.
There are three types of virtual menus you can create.
Radial Menu – A circular menu will pop up on screen showing the assigned commands. You tilt/press the assigned input in the direction of your choice to make a selection.
Touch Menu – Similar to radial menu, except the outputs are arranged in a grid or list format.

Hotbar – A virtual hot bar you can navigate through, similar to inventory slots in a game.

Radial Menus can be created for:
-
Trackpads
-
Thumbsticks
-
Directional pad
-
ABXY button cluster
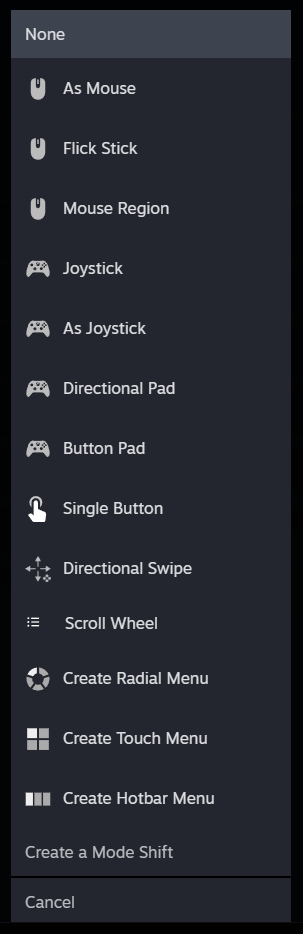
Creating a radial menu can be done by selecting “Create Radial Menu” from the behavior drop down for the input you intend to use.

After selecting Create Radial Menu, you’ll need to name it. This will allow Steam to remember your menu in case you decide to use it with other inputs within that same game’s configuration.
Once named you can start creating your menu options. You can add a command to the center of the menu by setting a Radial Menu Center Button (1). This allows the center of the circle to be a menu option as well. Note: Radial Menu Center button is only available in a menu created with the thumbstick or trackpads.
To add an entry for your radial menu, click Add Virtual Menu Entry (2) and map it like you would any other button. Continue adding entries to include all the options you want within the virtual menu. The maximum amount of entries you can have is 20.

A preview of what you will see on screen will be shown on the bottom left Radial Menu Settings window.

Customizing the Appearance of Radial Menus
For each Radial Menu Button, you can select an icon by selecting the circle to the left of the entry (1). You can give your entry a custom name by selecting the gear to the right of the entry (2), and selecting rename command.

Using the Radial Menu in a game
For the thumbsticks, directional pad (D-Pad), and button pad, the default method for choosing and activating an entry in the Radial Menu is to highlight the desired entry while pressing down, then release the control while the selection is highlighted (Touch Release). Conversely, the trackpad default method involves pressing down on the control (Click).
More specifically:
-
For Thumbsticks: Tilt the stick until your choice is highlighted, then release.
-
For D-Pad and Button Pad, you need to press one of the buttons (D-Pad or ABXY) to bring up the menu. If the button you pressed is not the desired action, continue pressing as you rotate through the buttons to get to your choice, then release the button to activate. Note: Rotating through the options is a bit more intuitive for D-Pad, but you can do the same thing with ABXY and it will work.
We recommend maxing out D-Pad/ABXY radial menus at 8 options; anything higher than that and you won’t have the fidelity to select some options.
-
For the Trackpads, highlight the desired selection and press down on it (Click).
To change the selection behavior, select General and Radial Menu Button Type.

There are 4 ways to customize how the entry is selected:
-
Click – The command is sent when the input is pressed
-
Release – The command is sent when an entry is highlighted and the input is released
-
Touch Release – The command is sent when an entry is highlighted and the input is no longer being touched
-
Continuous – The command is continuously sent while the highlight is selected

You can further customize the location and size of the menu in the on screen display section.

Touch menus can be created for the following inputs:
-
Trackpads
-
Thumbsticks
-
Gyro
Creating a Touch Menu for these inputs is done by selecting “Create Touch Menu” from the behavior drop down.

After selecting Create Touch Menu, you will need to name the Touch Menu. This will allow Steam to remember it in case you use it with other inputs within that game configuration.
After naming your Touch Menu, you will be presented an option to start creating your menu. To add an entry for your Touch Menu, select Add Command (1) for Touch Menu Button 1 and map like you would any other button. To add more buttons select Virtual Menu Entry (2).
Continue to add entries to include all the options you want for the virtual menu. The maximum amount of entries you can have is 16.

A preview of what you will see on screen will be shown on the bottom left of the Create Touch Menu Settings window.

Customizing the Appearance of Touch Menus
For each Touch Menu Button, you can choose an icon by selecting the circle to the left of the entry (1). You can give your entry a custom name by selecting the gear to the right of the entry (2), and clicking Rename Command.

Using the Touch Menu in a game
For thumbstick and trackpad, the default method for selecting an entry in a Touch Menu is to highlight a selection and pressing in (on the thumbstick or trackpad) while the item is highlighted (Click). For Gyro, by default, the selection is done by pressing A.
To change the selection behavior, select general and select touch menu activation style.

There are 4 options for how the entry is selected:
-
Click – The command is sent when the input is pressed
-
Release – The command is sent when an entry is highlighted and the input is released
-
Touch Release – The command is sent when an entry is highlighted and the input is no longer being touched
-
Continuous – the command is continuously sent while the highlight is selected
You can further customize the location and size of the menu in the on screen display section.

Hotbars can be created for:
-
Trackpads
-
Thumbsticks
-
Directional pad (D-Pad)
-
ABXY button cluster
Creating a Hotbar with these inputs is done by selecting “Create Hotbar Menu” from the behavior drop down.

After selecting Create Hotbar Menu, you will need to name it. This will allow Steam to remember your menu in case you decide to use it with other inputs within that game configuration. After naming your Hotbar, you will be presented an option to start creating entries. To add an entry to your Hotbar, select Add Virtual Menu Entry. The maximum amount of entries you can have is 16.

As you are creating the Hotbar menu, a preview of what will be seen on the screen is shown to the left of the Create Hotbar Menu Settings window.

Customizing the Appearance of Hotbars
You can select an icon to show for your entry by selecting the circle to the left of the entry (1). You can give your entry a custom name by selecting the gear to the right of the entry (2), and selecting rename command.

Using a Hotbar in a Game
To bring up the hotbar in a game, press “down” on the input you selected (for ABXY, “A” is considered “down”). Cycle through the options of the hotbar by pressing “left”/”right” on the input (for ABXY, “B/X” are considered “left”/”right” respectively). Once the desired command is selected press “up” on the input to send the command (for ABXY, “Y” is considered up).
Like the other virtual menus you can customize its size and location in the Onscreen Display section.

Virtual menus are an extremely powerful tool that you can use along with your Steam Controller to have quick access to all the commands you need. Whether you want access to emotes in an MMORPG, or toggle between inventory slots in an extraction shooter, virtual menus give you instant access to any command, however you want to access them!
Learn more about Steam Controller on its product page, and keep an eye on the Steam Hardware Blog for more tips and tricks with how-to guides and closer looks.