Steam Controller launched on May 4th, with all the inputs you’d expect plus advanced features (like trackpads) that let you game however you like. The trackpads make every game on Steam playable by providing a ton of functionality to play games of all kinds:
-Need to map 20 hotkeys to a virtual menu? No problem.
-Want a giant screen shot button? Sure.
-Looking for a button that automatically delivers your favorite food? Oh, um. It can’t do that. But even if you don’t need additional in game functionality, the trackpads can also serve as superior cursor control or aiming experience compared to thumbsticks.
We touched on the capabilities of the trackpads briefly in a previous blog post about Steam Input Configurator, but wanted to provide a deeper dive on everything you can do. Here is how to get the most out of the trackpads on your Steam Controller.
There are two primary use cases for the trackpads:
-
To control a mouse cursor or to aim. This is done two main ways:
-
As a mouse, you can use it as everything from a simple cursor that navigates UI buttons, to precise aiming in a highly competitive fast paced shooter. Utilizing both trackpads together can provide an even more complete mouse experience. We recommend this as a primary method. For games that do not handle mixed input (mouse/keyboard and gamepad at the same time causing performance issue or flickering input glyphs), set the template to a mouse/keyboard template. If seeing gamepad glyphs are really important, or a mouse/keyboard template will not work we recommend “as a joystick”.
-
As a joystick, it’s similar to above but used more often when games struggle with mixed input (mouse/keyboard and gamepad at the same time). This makes the game believe a joystick is being used, but the actual interaction feels like a mouse. This requires a lot of fine tuning to make a good experience.
-
-
As a way to provide mapping for various keys, buttons, shortcuts, or system level functionality that isn’t possible with a traditional controller. This can be done many ways, but the two most common are:
-
As a button/button cluster/directional pad: You can assign each trackpad as one big button or each direction on each trackpad to a separate button, which gives you access to 4 more buttons per trackpad that are easy to press.
-
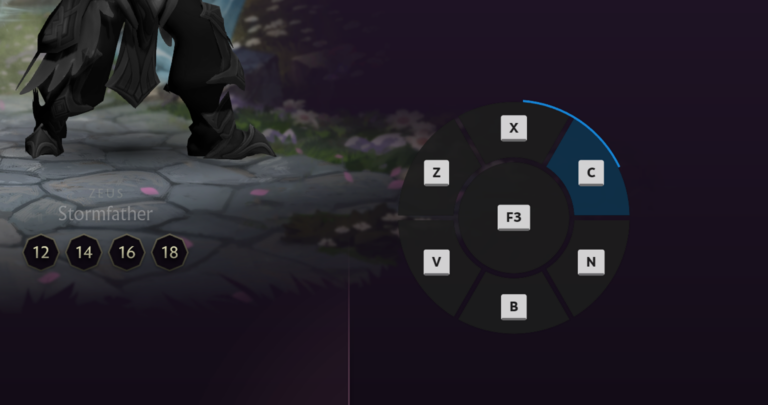
As a virtual menu: If 4 buttons per trackpad aren’t enough (no judgment!), you can create a radial/touch menu so touching a trackpad pulls up a customizable menu with up to 20 options.
-
The above is not exhaustive (see the below in this guide for all of the options) but it is what we consider to be the most common use cases. This guide will explain how to set these different scenarios up.
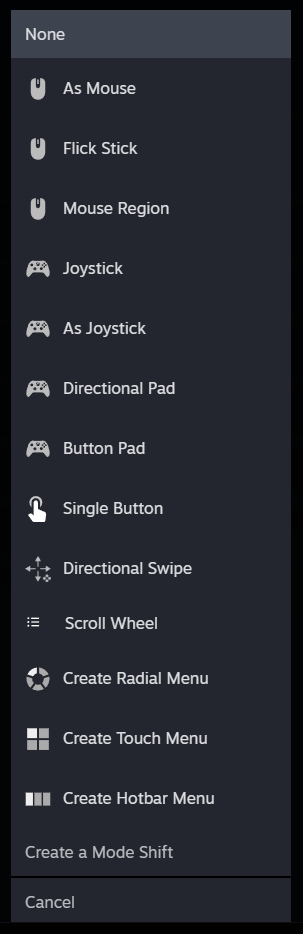
In the Steam Input Configurator, when selecting the Trackpad Behavior drop down, you will be presented with the following options:
Here’s a breakdown of what each of these options mean:
-
None – The trackpad will be turned off
-
As Mouse – The trackpad will emulate a mouse. Note: If you select “As Mouse” and the game you are playing begins flashing controller glyphs and keyboard glyphs rapidly, or even crashing, please try setting the controller config to full mouse and keyboard using the layout templates. If you strongly desire controller glyphs, try “As Joystick” (see below).
-
Flick Stick – Turns a left/right/down swipe into a rapid, predetermined amount of pixel rotation. Typically used for rapidly turning (90/180 degrees) in competitive games, or for making large scale adjustments when using another input for fine aiming (gyro or other trackpad)
-
Mouse Region – Set the trackpad to emulate a mouse, but only in a rectangular subsection of the full screen. This can be useful if a game you are playing has a key UI HUD located in the same place the whole game. The dimensions and location of the rectangle are fully customizable.
-
Joystick – The trackpad will emulate a joystick: Press on the top part of the trackpad and the output will be like a fully deflected thumbstick pressed up.
-
As Joystick – The trackpad will emulate a mouse, but provide an output like a thumbstick. Works for games that do not handle mouse input and gamepad input at the same time. (Note: You may need to tweak sensitivity or deadzoning settings in the game for best responsiveness.)
-
Directional Pad or Button Pad – The trackpad will emulate a 4-way directional pad or button cluster (ABXY). Press on the top, bottom, left or right of the trackpad to get a direction, or button. You can map the output of each direction like you map any other button. (Note: Directional Pad includes the capability to press “diagonals” – i.e. top right corner will press Up and Right together)
-
Single Button – Make the trackpad a giant button by setting it to behave as a single button. Press down on it and get the assigned output.
-
Directional Swipe – Use directional swipe gesture to provide an output, Swipe Up, Down, Right or Left. You can map the output of each swipe like any other button.
-
Scroll Wheel – Rotate clockwise or counter clockwise on the trackpad. Great way to emulate the scroll wheel on a mouse to zoom in and out in a RTS game.
-
Radial Menu – The trackpad will pop up an on-screen menu over the game that can be customized to include whatever output you like.
-
Touch Menu – Similar to Radial Menu, except it provides selections in a grid format.
-
Hot Bar – Creates a virtual hot bar: Press down on the trackpad to bring it up; press right or left to cycle through options; then press up to select the item.
Note: For more information on radial menu/touch menu/hot bar, see Getting the most out of your Steam Controller: Virtual Menus.
Many games on PC are intended to be used with a mouse: Older games, deckbuilders, point and click adventures, fast-paced FPS and many puzzle games are great examples of this. The right trackpad is commonly used as a mouse replacement for these types of games. You can build up functionality of a full mouse based on the games you want to play and how you want to play them.
Mouse control – FPS games, or games where you only need to “aim” with the trackpad
Select one of your trackpads to “As Mouse” in the configuration tool. This will make the trackpad behave as a mouse (movements of your thumb will directly move the mouse cursor).


Clicking the gear next to “Behavior” will give you several options:

Options to adjust settings, including:
-
Sensitivity – The higher the value for sensitivity, the more mouse motion you will see for a given swipe on the trackpad. Adjust this if you think you need to swipe too much (or too little) for how the motion appears in game.
-
Vertical Sensitivity – Changes the sensitivity ratio between horizontal and vertical motion on the trackpad. In most FPS games, you can move around horizontally forever, but vertically only until looking fully up or down. Because of this, you might prefer much more sensitivity horizontally than vertically.
-
Invert X/Y output – Toggle these to invert your output. Similar to using a flight stick.
-
Trackball Mode – In trackball mode, when you swipe and let go, the swipe will have momentum (like a ball rolling) and will continue to move the mouse in that direction for a while. If you prefer the mouse to stop as soon as you release your finger, turn this off.
Adjust these to your preference.

Tips for using in FPS gaming:
-
Mapping left/right mouse click to the left/right trigger makes the layout feel more like a traditional gamepad layout. Depending on the game making the left trackpad a directional pad as a short cut for various equipment, or a virtual menu to help with inventory management or quick chat events.
-
Protip: Shooting, jumping, reloading, etc while aiming is important in fast paced FPS games, Mapping A, B, X, Y to R4, R5, L4, and L5 allow you to continue aiming while doing actions typically mapped to the ABXY button cluster.
Mouse + Click – Casual point and click, deckbuilders, etc.
Adding click to mouse control gives you ease of moving a mouse and clicking and dragging. By default the left click behavior for when you set a trackpad “As Mouse” will be pushing the same trackpad in (click). However if a game requires any kind of drag and drop behavior or has small targets, it is advised to map left click to a separate input. In many templates it is set to right trigger.
We have found one of the most interesting ways to do this is to set the opposite trackpad to left and right click. On most templates the left trackpad is set to a directional pad, and we can just leverage that to turn it into a left and right click. In the drop down make sure Directional Pad is selected:

If you just want the trackpad to be left and right click, you will need to disable the up directional and down directional input. You can do this by clicking in the gear settings and then select remove command.


Then map the left directional to left click and the right directional to right click.


With this layout, you can comfortably play any game that requires mouse and clicking/dragging. We’ve played this way in a lot of deck builders and casual point and click games.

Mouse + Click + Scroll Wheel – Strategy games, RTS, games that need zooming
In many games the mouse scroll wheel is used to do several things, including scrolling through long lists of items or zooming a camera in and out. Building on the directional pad method for left/right click mentioned above, we have found mapping the up direction and down direction to “Scroll Wheel Up” and “Scroll Wheel Down” works well. Click in each box like the previous section, navigate to mouse, and assign scroll wheel up and down.


One important note: if you want it to behave as a continuous scroll, you will need to click the gear icon → Settings → Turn on “Hold to Repeat (Turbo)”. You can change the “Repeat Rate” to tune how fast the scroll command repeats


If you need middle mouse click (for rotating or panning), you can set right trackpad click to middle mouse click. Or, if you don’t like pressing and dragging at the same time, you can put middle mouse click on one of the grip buttons (L4/L5/R4/R5).

While this above set-up works great for us, you may find a better one for you, Feel free to experiment and share your configurations. That is one of the most exciting parts about how the Steam Input Configurator works – you can map it how you like!
What if I just want more buttons?
If you just want more buttons, you can always set both trackpads to directional pads, button pads, single buttons, or even button swipes. All of these give you the ability to add more easily accessible buttons to your game, up to 8 if you use two trackpads as directional pads.
While you could do this for gamepad buttons, it is also powerful when remapping keyboard keys.
Depending on how many keys you need for a game you have several options. If you only need a couple of keys then setting the trackpad to a “Button Pad” or “Directional Pad” would work as well.
Mapping keyboard keys is similar to how you map other buttons, in this example you can set the left trackpad as a “Directional Pad” and then select “Add Command”.

Select Keyboard from the input options and then select the key you would like to emulate.

Many games require a ctrl or shift press for an input, to act as an modifier. One example is in RTS control is often used to select or modify a group. To set an input chord to be control + 1.


Select the settings of the Control Key.

Select “Add Extra Command”


This creates a chord for Ctrl + 1.

Not enough – more buttons please!
If 8 additional buttons aren’t enough (we’ve played MMORPGs, we know how it goes), then virtual menus are another place where the trackpads shine. You can set the trackpad to bring up a virtual menu that can give you quick access to your own custom action menu within a game. Radial menus can have up to 20(!) options built in; touch menus up to 16; and hot bars up to 16.
We have a guide 100% focused on setting these up (Getting the most out of your Steam Controller: Virtual Menus), but wanted to mention it while you’re thinking about trackpads:
Radial Menu – A circular menu will pop up on screen that point or move in a direction to select:

Touch Menu – Similar to radial menus, except the outputs are arranged in a grid or list format:

Hotbar – A virtual hot bar that can be navigated and selected, similar to inventory slots in a game:

If the game you want to play already has good controller support, the trackpads can still provide additional functionality. An example is using the trackpads to system level functions, like the volume buttons or capturing a screen shot.
Using Directional Swipes to Change Volume
We’ve found one intuitive way to change the volume is to use the “directional swipe” trackpad behavior option.
From the trackpad behavior dropdown select Directional Swipe:

For Swipe Up, select System → then Volume Key Up:

For Swipe Down, select System → Then volume down.
To make the swipes more responsive (move the volume more positions with one swipe): select the gear next to the Directional Swipe drop down and in the Scroll Wheel Mode drop down select Vertical Only.


Using the Trackpad to Invoke the On-Screen Keyboard
Another usage is to bring up the on screen keyboard. This is super handy because interacting with the on screen keyboard, for a controller, can feel challenging. We’ve designed the trackpads to be a simple and fast way to type.
In the trackpad behavior drop down, select Single Button.

Select Click, “add command.” System → Show Keyboard.


We find this interaction is best while setting the button behavior to “Start Press”. Select the gear to the right of “Show Keyboard”, select Regular Press and then Select Start Press. This will make the keyboard appear as you press down.


With the power of the two trackpads and the Steam Input Configurator, virtually anything is possible with the Steam Controller. We encourage you to explore different ways to use the trackpads for how you like to play.
Learn more about Steam Controller on its product page, and keep an eye on the Steam Hardware Blog for future how-to guides and closer looks. We also have this video on our official YouTube channel that takes you on a quick-start tour of Steam Controller.