Steam Controller launches May 4th at 10 am Pacific on Steam. Ahead of that (and beyond!), we’ll be using the Steam Hardware Blog to share a closer look at different ways to utilize the full potential of Steam Controller; starting with Steam Input Configurator.
The Steam Input configurator is a set of tools provided by Steam that allows you to fully customize your Steam Controller experience for each individual game (and it also works with other controllers too).
The Steam Input configurator lets you:
-
Rebind/remap buttons for a game, and customize the way those buttons work
-
Save/export your own layouts and import your favorite community made layouts
-
Enable/disable advanced inputs like trackpads, gyro, and grip buttons
-
Adjust the sensitivity and modes of the advanced inputs like trackpads and gyro
-
And much much more!
These configurations are saved per game; if you find one you like, you will need to apply it for each game. That said, Steam also provides tools to make this easier by allowing you to save and export your favorite layouts (more on that below).
Read on for step-by-step guides on how to use the Steam Input configurator.
We save configurations per game, so game detail pages or while in-game are the best place to find it.
-
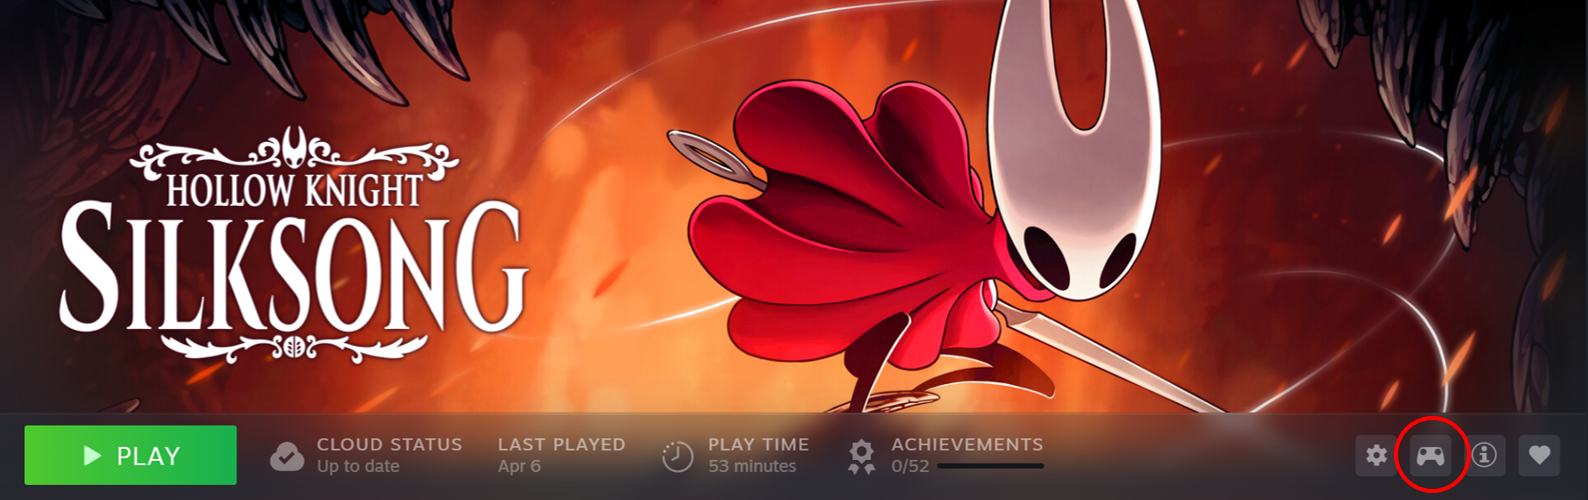
Navigate through your library to the game for which you’d like to edit the configuration
-
Click on the controller icon
-
The configurator home screen will open
-
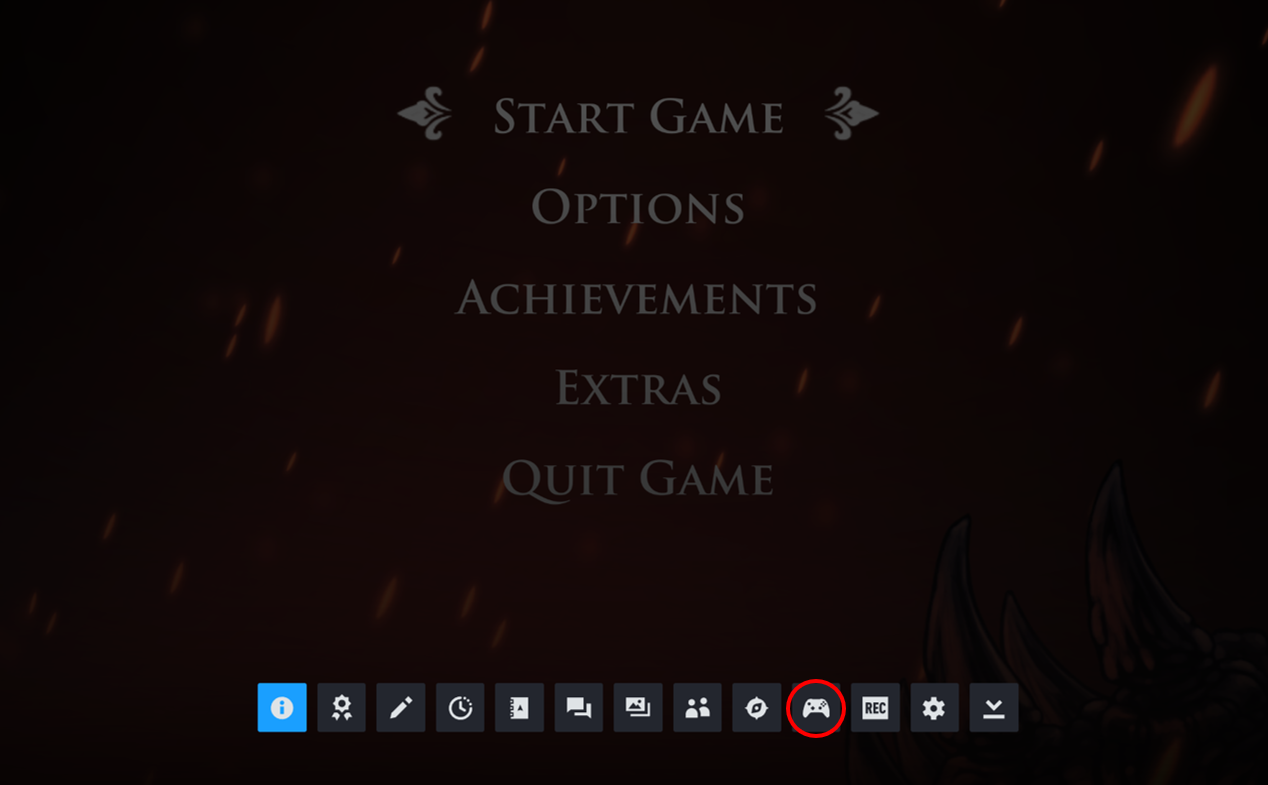
While inside a game, press the Steam button on your Controller
-
Click on the controller icon on the bottom of the screen, and the configurator screen will open
Reminder: When using the Steam Controller in desktop mode, the right trackpad can be used to control your mouse cursor. Pushing in the right trackpad will provide a left mouse click. When the configuration tool is open you can control using traditional gamepad inputs.
If you are outside of a game, you can access the configurator in the same way you can in the Desktop App when outside a game. Navigate to the game’s page in your library and select the controller Icon below the game artwork.
-
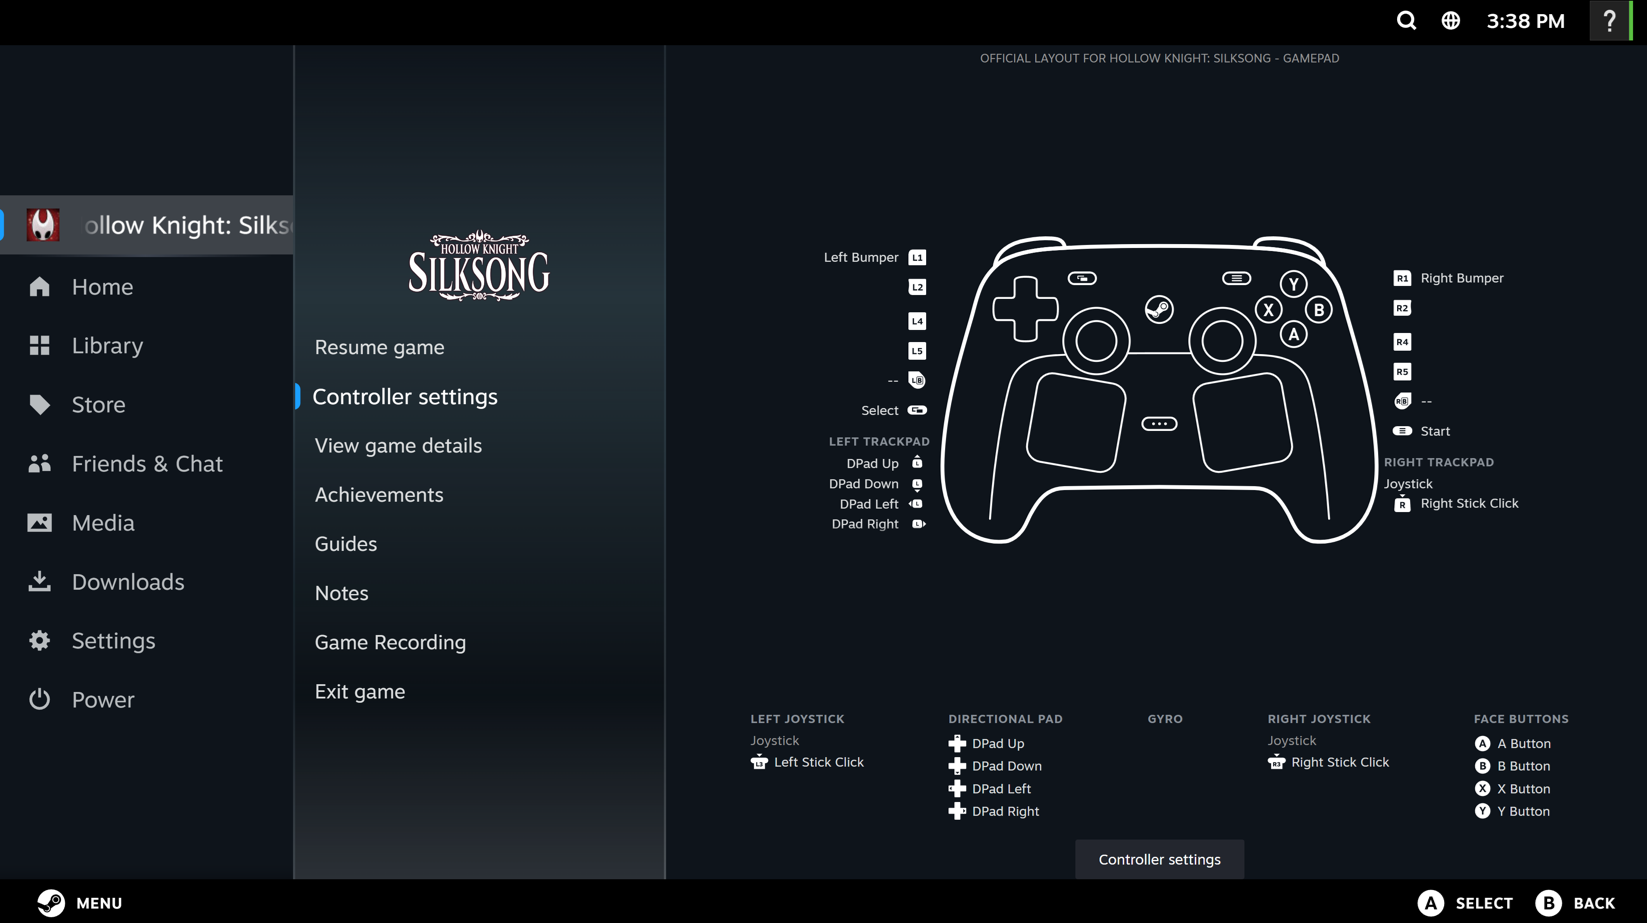
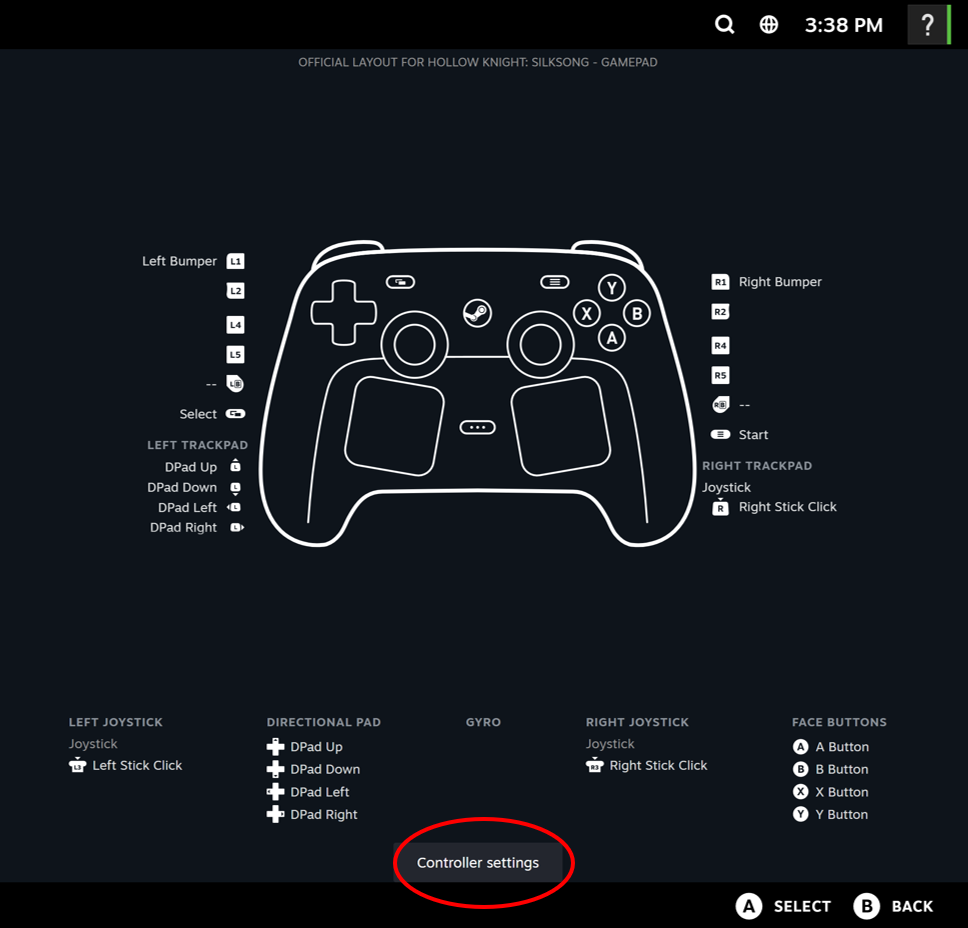
While in a game in BPM, hit the Steam button on your controller, the controller settings will open.
-
Navigate to and click on the Controller Settings box (Note: you can also navigate directly to the input you want to modify from this screen, but it will take you to the Edit Layout screen – which we will discuss below)
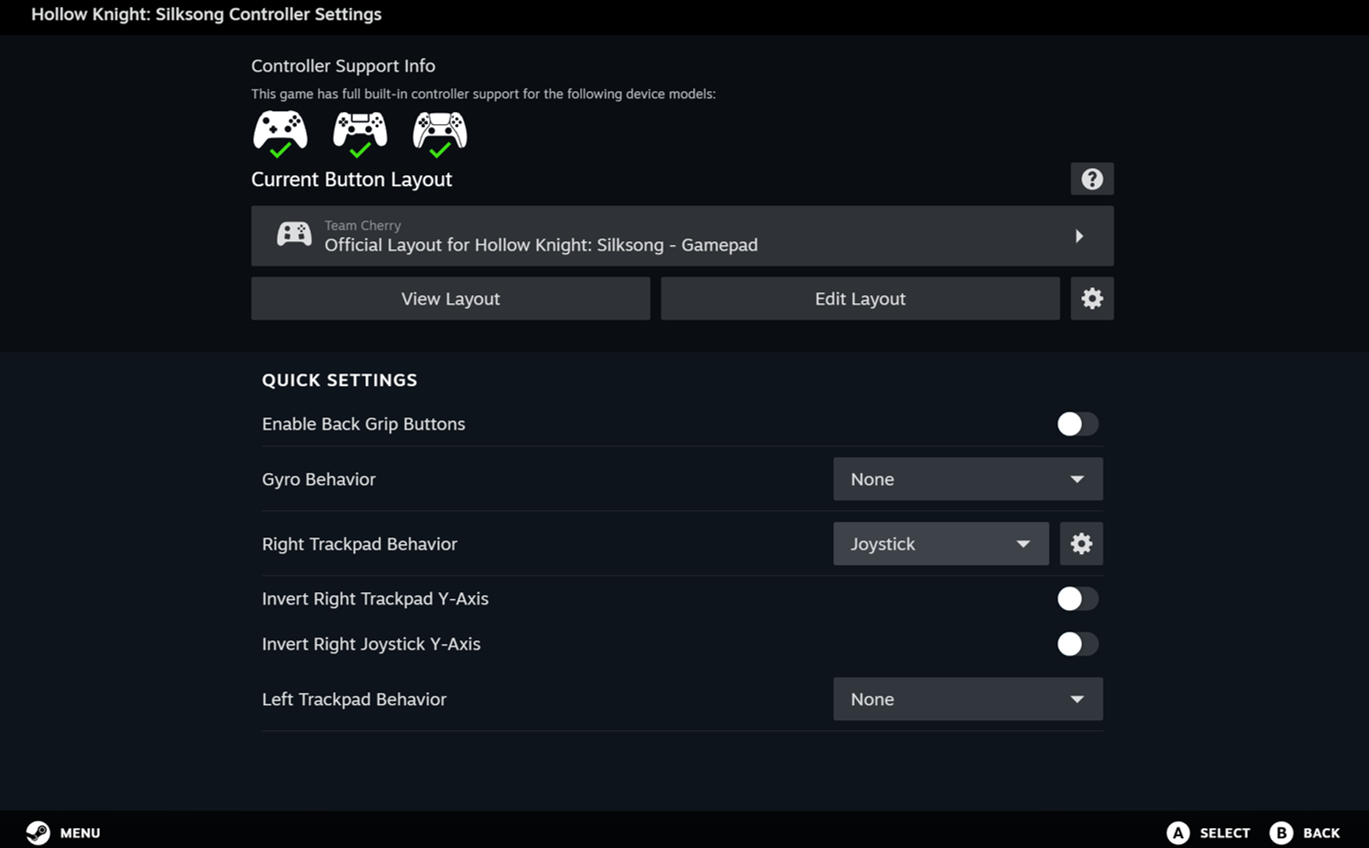
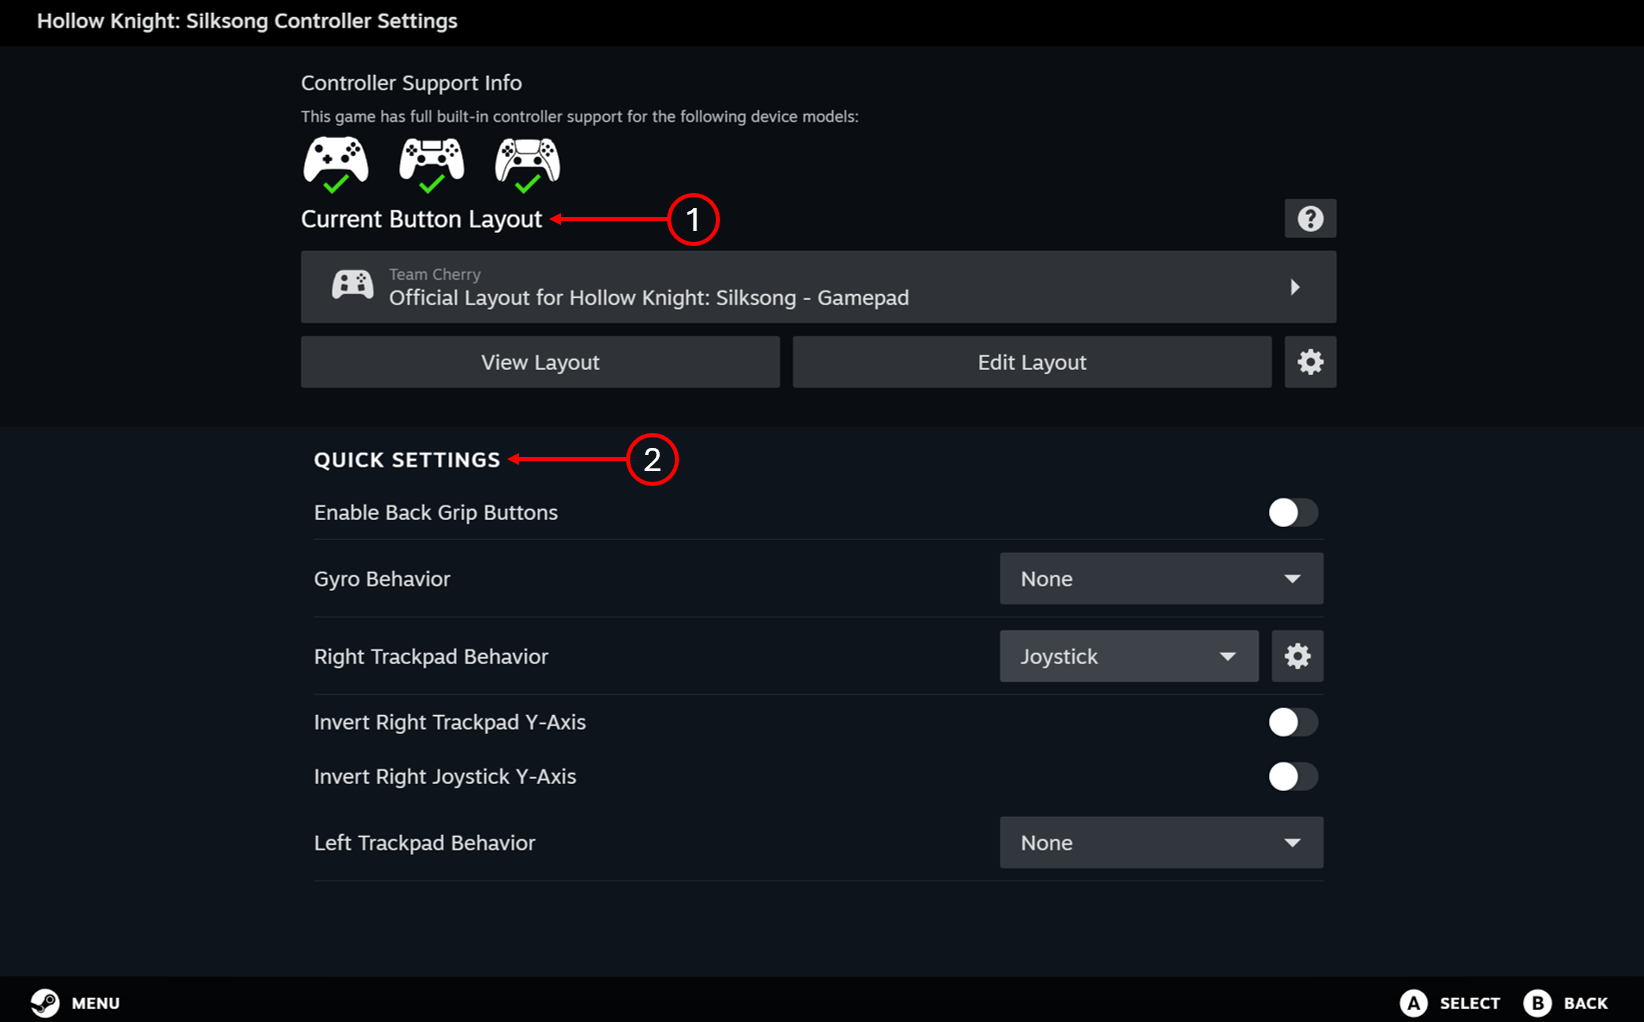
The configurator home screen has two main sections.
-
The Button Layout Section – this section is where you can find templates and view/edit your current layouts
-
The Quick Settings Section – this section is where you find quick access to commonly modified settings
In the layout section there are buttons that help you easily:
-
Search for Controller layouts provided by the developers, Valve, the community, and yourself!
-
Quickly view the applied layout
-
Edit your current layout, remap/rebind keys, and much more
-
Export your current layout for yourself to use in other games or even the community to use!
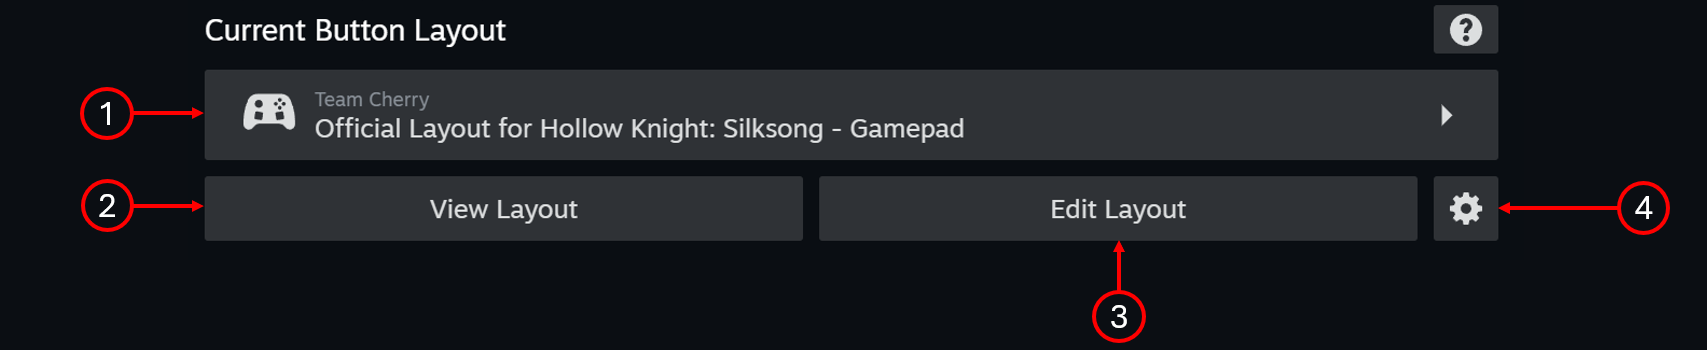
To get into the layout menu, click on the box shown in item 1 above. The layout window will open.
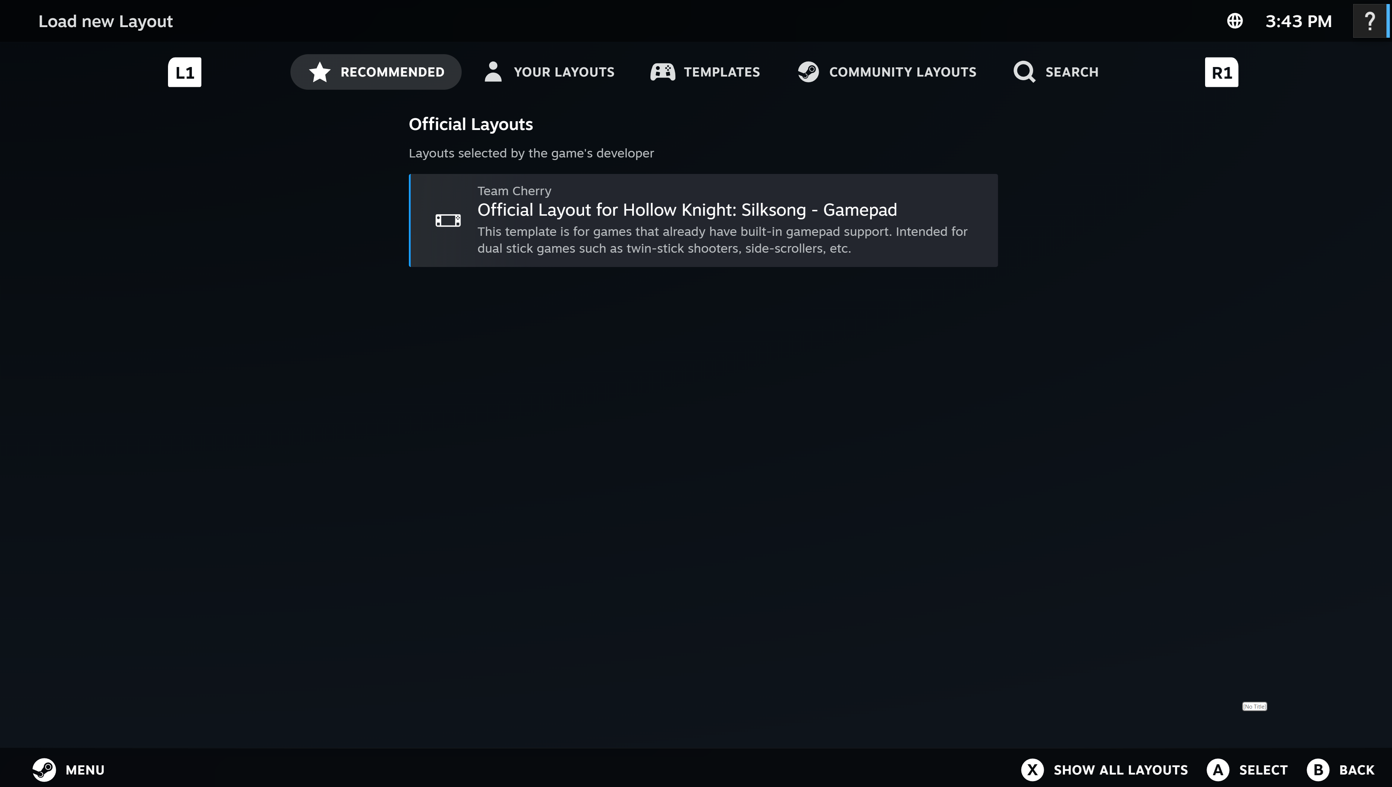
The default layouts, shown in the recommended tab, will be controller layouts set by the developer (or Valve if none was provided). You can navigate left/right to move through the tabs:
-
Your layouts – layouts for the current game created by you
-
Templates – generic layouts created by Valve (and you, if you have exported a layout template) that can be applied to any game
-
Community layouts – layouts for the current game created by the community
To apply a layout, select it from the layout menu. A quick view of the layout will show.
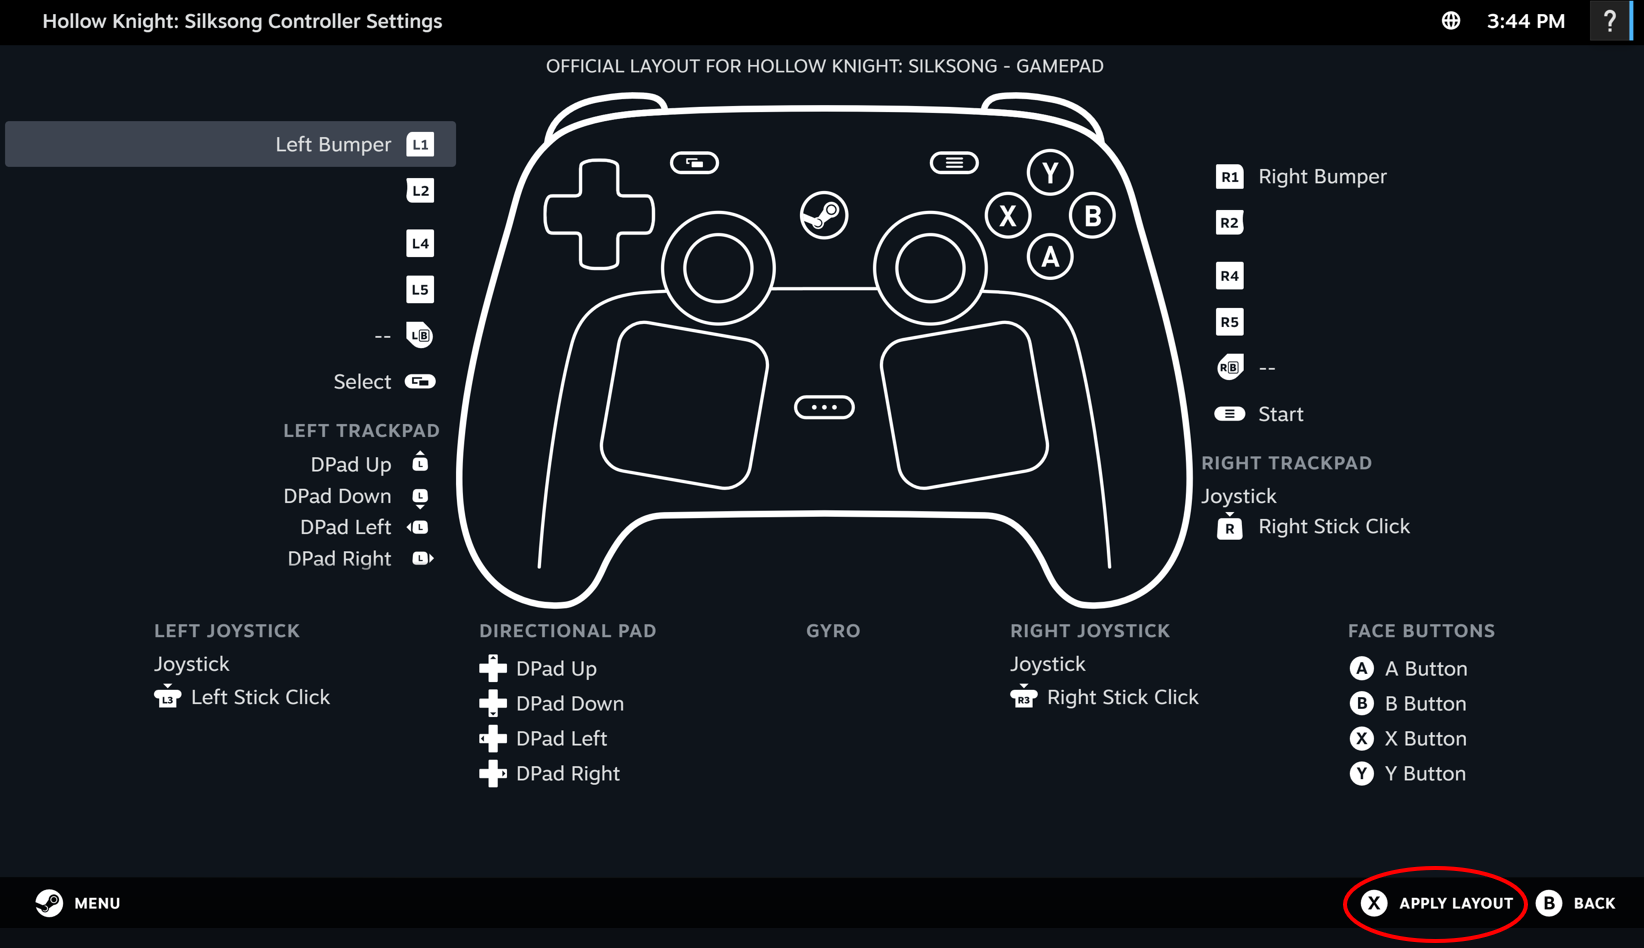
Press X, or click on Apply Layout, to apply layout.
To get into the layout editor, click the box labeled “Edit Layout” (item 3 in the image above). The layout editor will open. It will show all inputs that Steam recognizes for your controller.
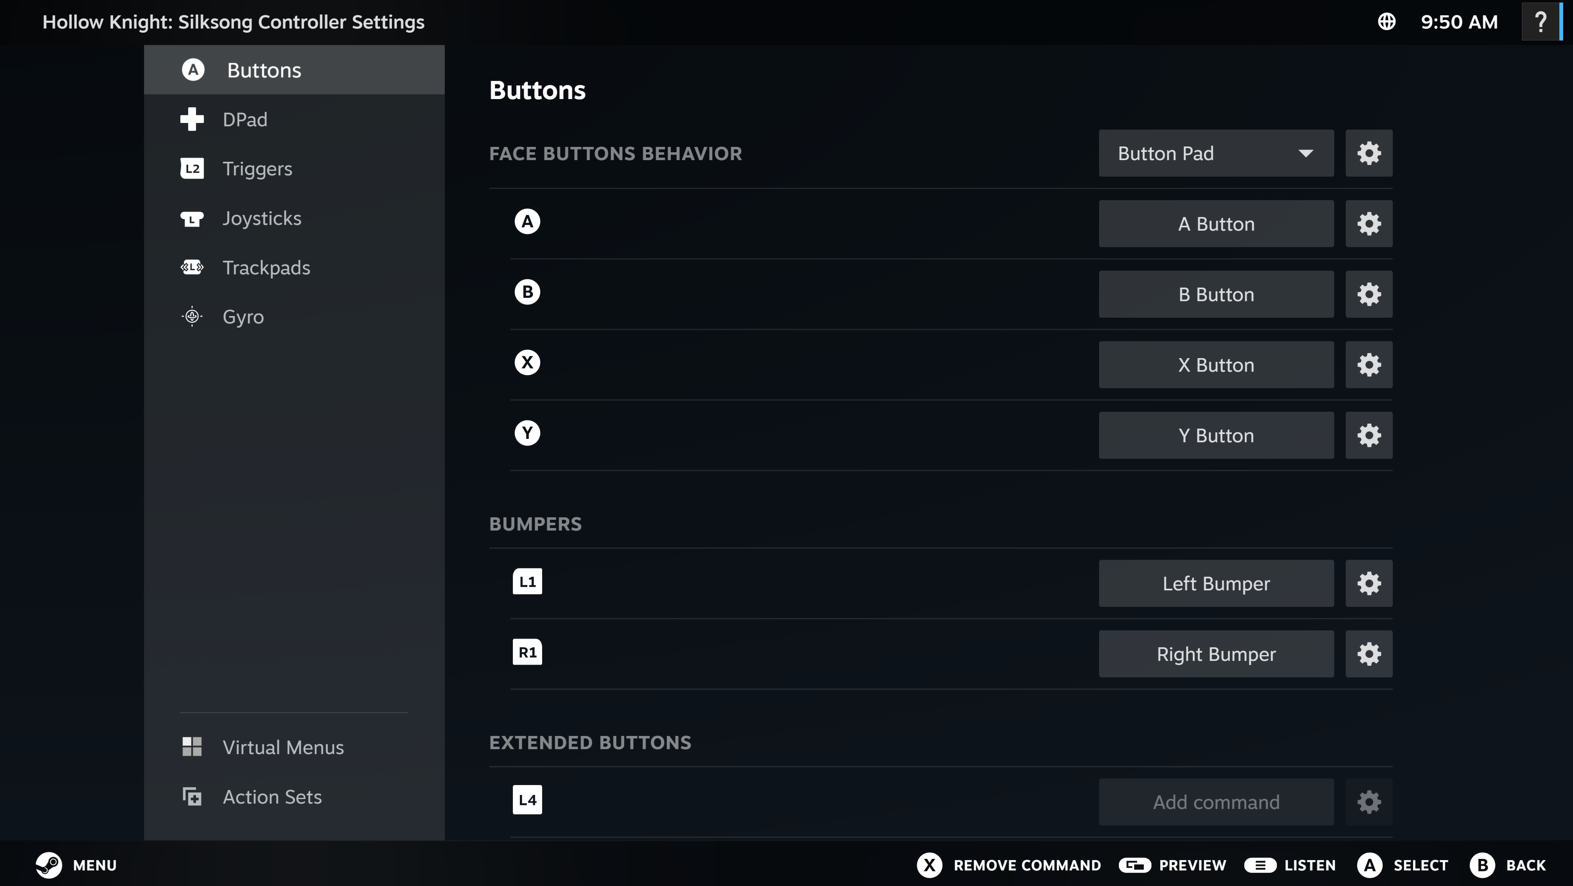
In this editor, you have the power to remap all of the controller inputs as well as change their behavior. It’s an incredibly powerful tool that you can use to customize your gaming experience. Each section will have some combination of these four items:
-
Behavior drop down – this is where you choose the high level behavior of that button (or button cluster)
-
Behavior settings – this is where you can fine tune the behavior (e.g. adjusting sensitivity on a trackpad, turning haptics on/off for button presses, etc.)
-
Button mapping – this is where you assign inputs to buttons
-
Button settings – this is where you fine tune the specific input (e.g. put a button into “turbo mode” – simulate a rapid press when it is being held down, etc.)
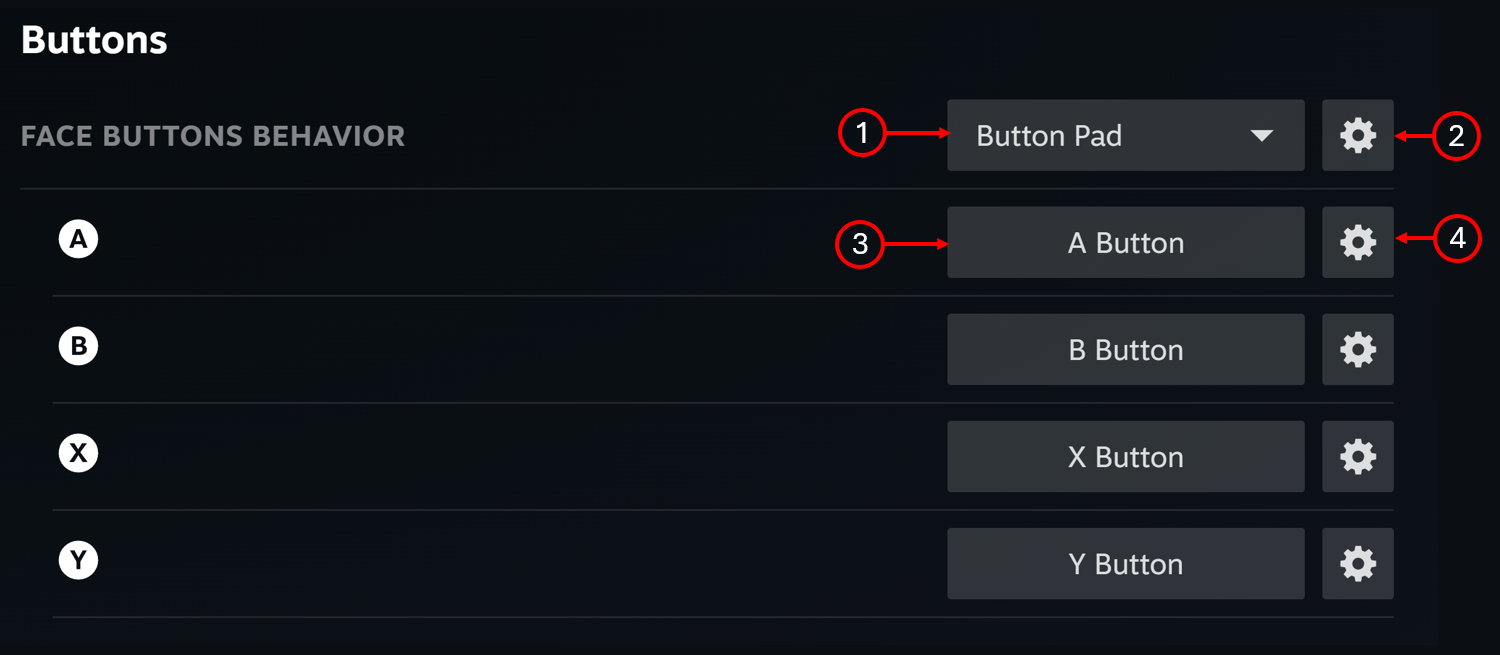
For the majority of remappings, you will not need to go into the settings menus (items 2 and 4). However if you want to fine tune the experience further or something is not quite behaving how you expect, we recommend digging in that menu to see if you can find what you’re looking for. There is a lot that you can do in these menus. We will have a more detailed post covering how those work in the future.
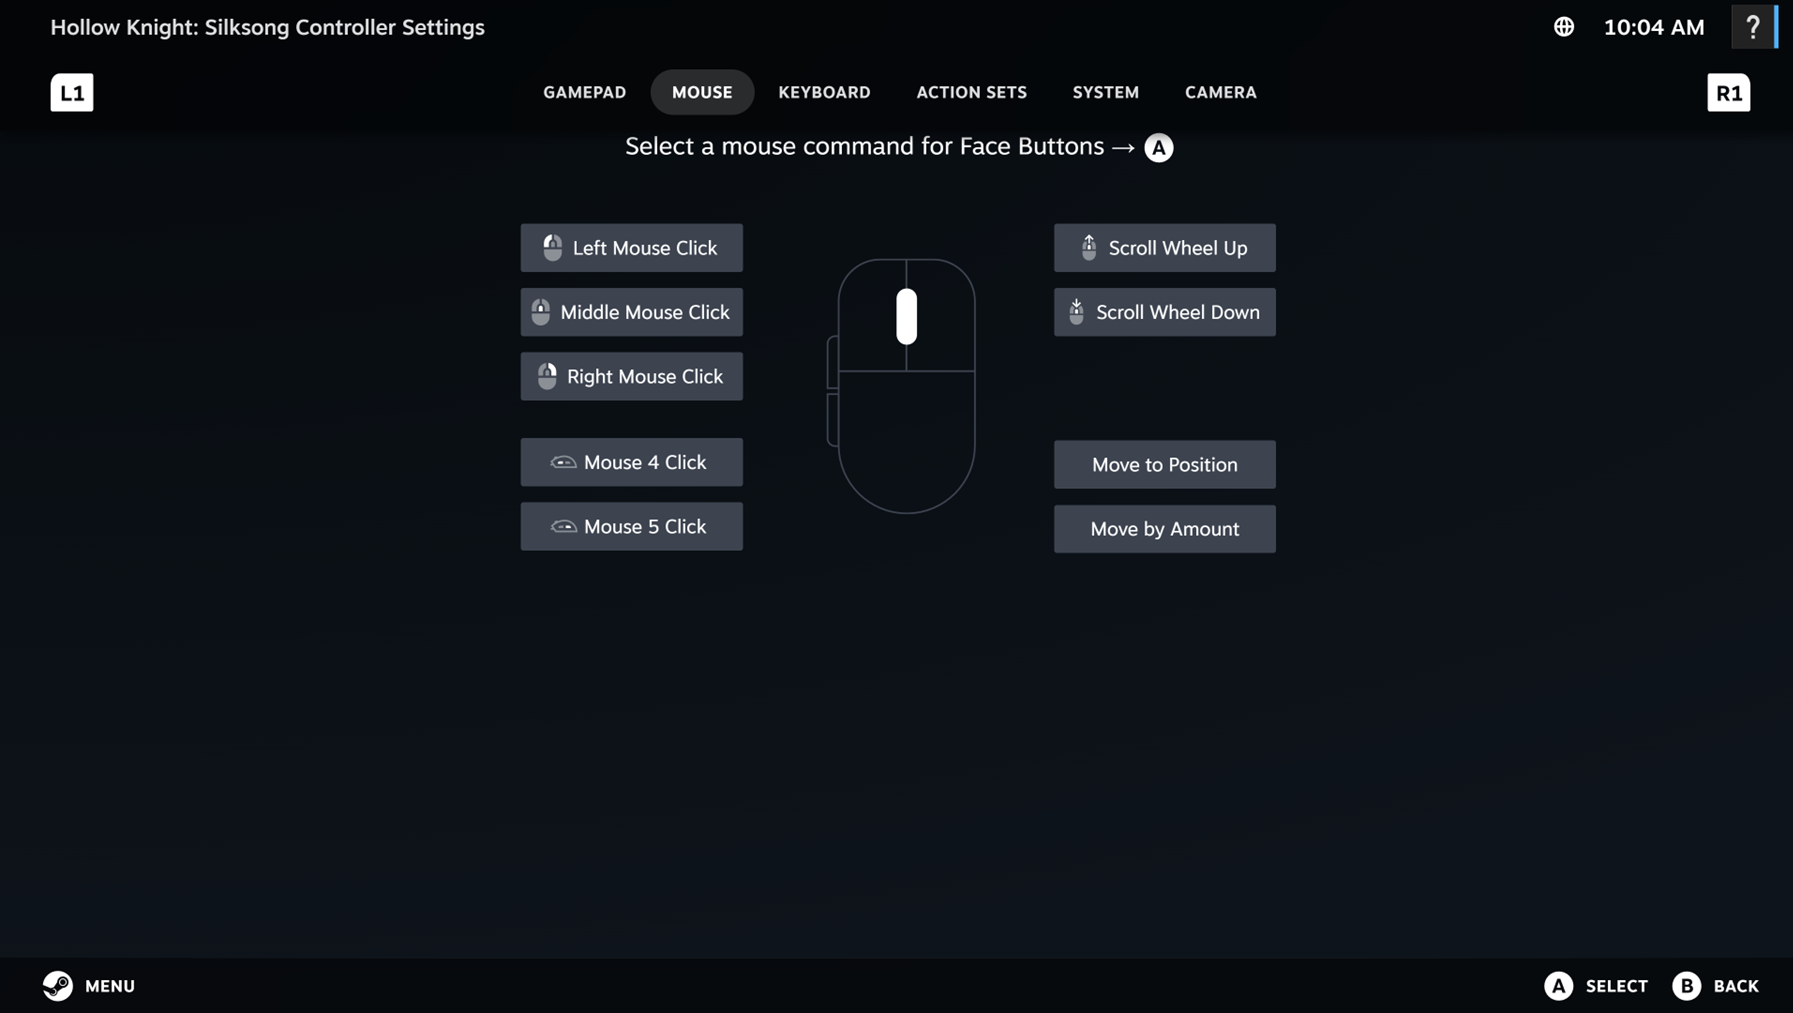
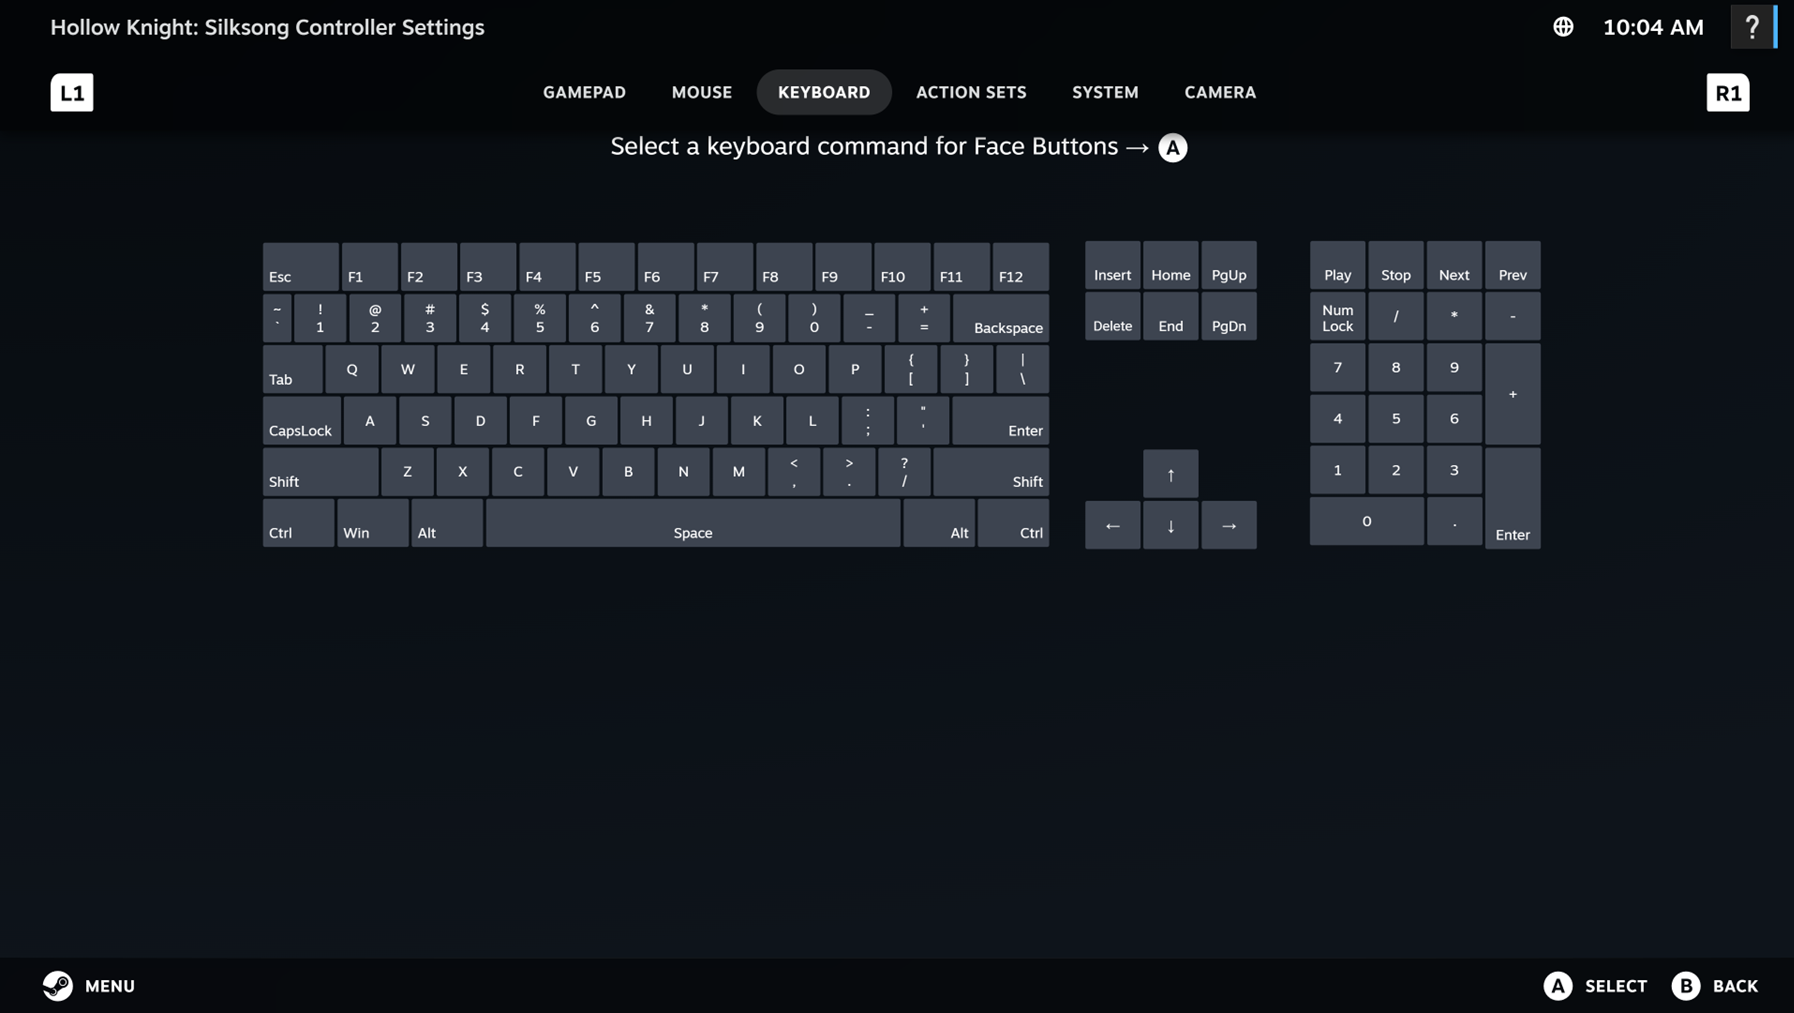
To remap a button, navigate on the side bar to the group of inputs you want to remap. In the instance of simple buttons it would be the Buttons or DPad section. Then navigate in the main page to the button you want to remap. Click/select the box. A screen will open up showing all the different buttons/inputs you can apply to that button. You can use left/right or L1/R1 to navigate between the screens, which each show a different set of selections.

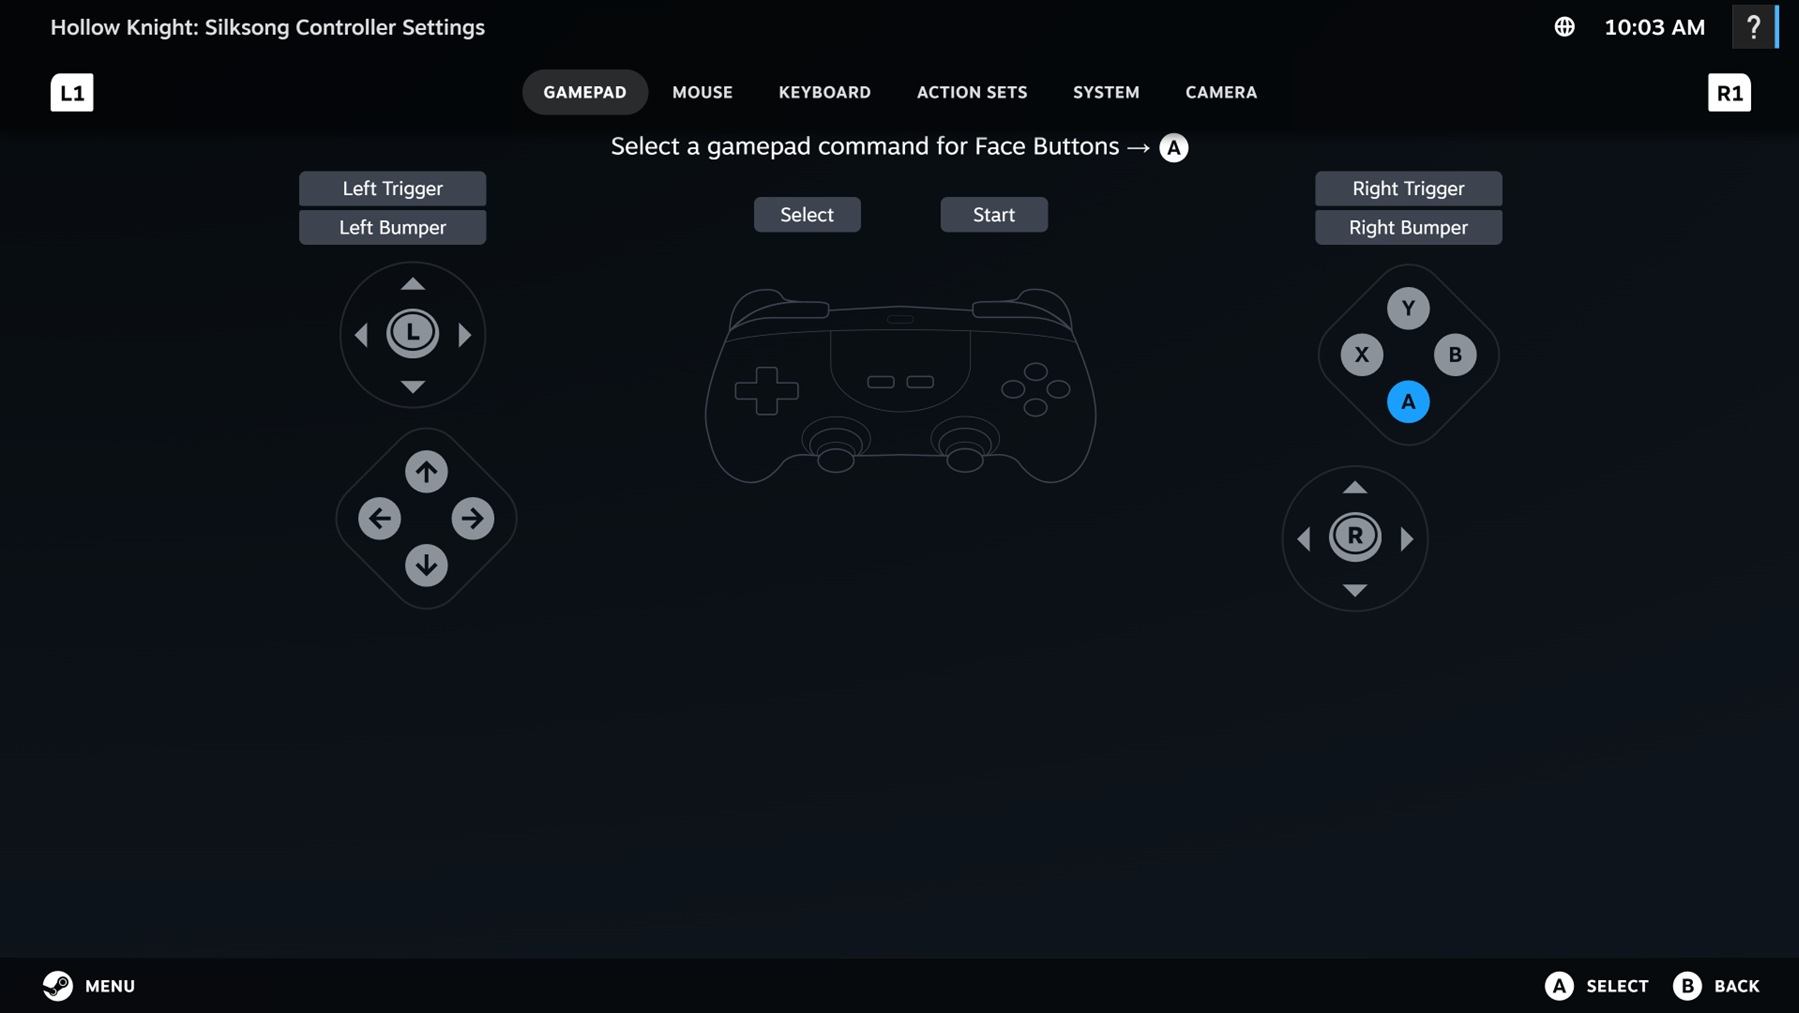
While navigating the input selector, the current assigned input will be shown in blue. Navigate to the input you’d like to remap the button to (it will highlight as white), and select with A.
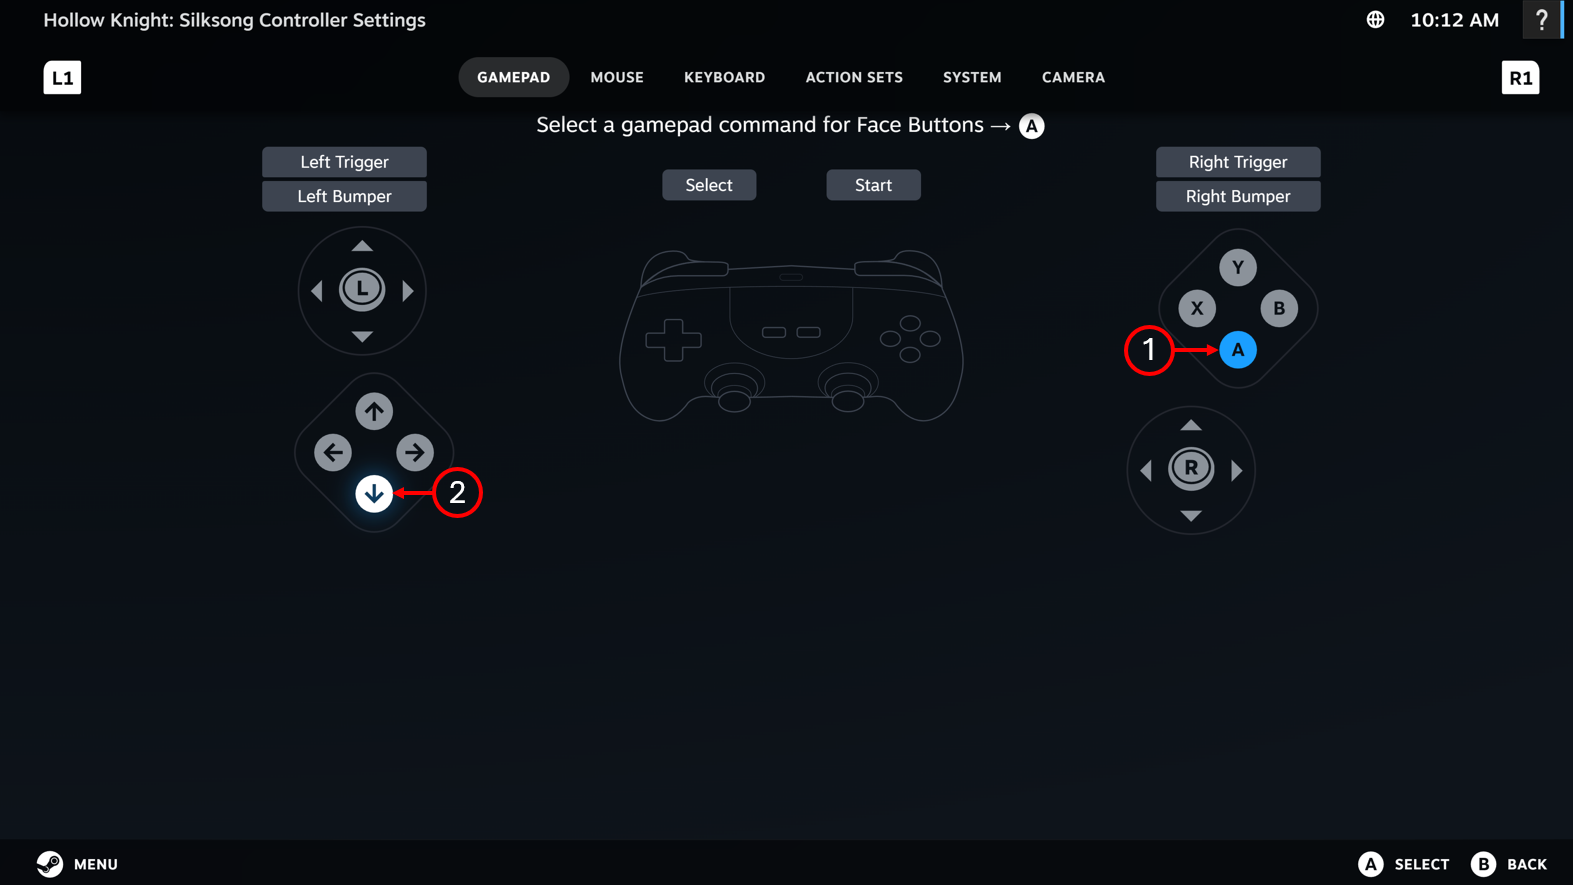
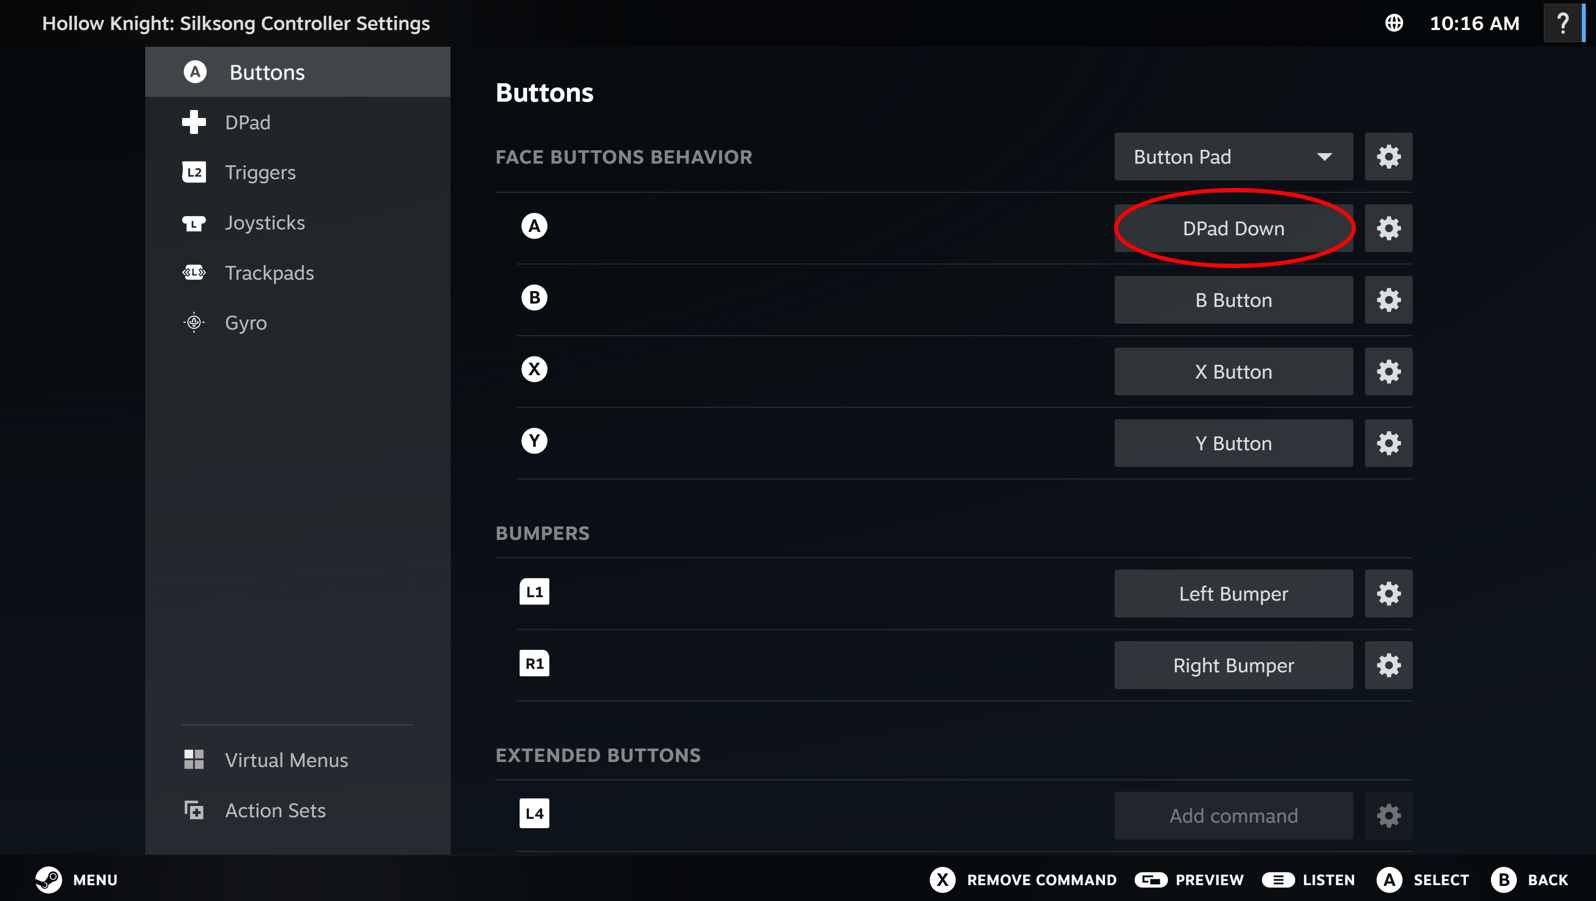 In this example we’ve remapped the A button to DPad Down.
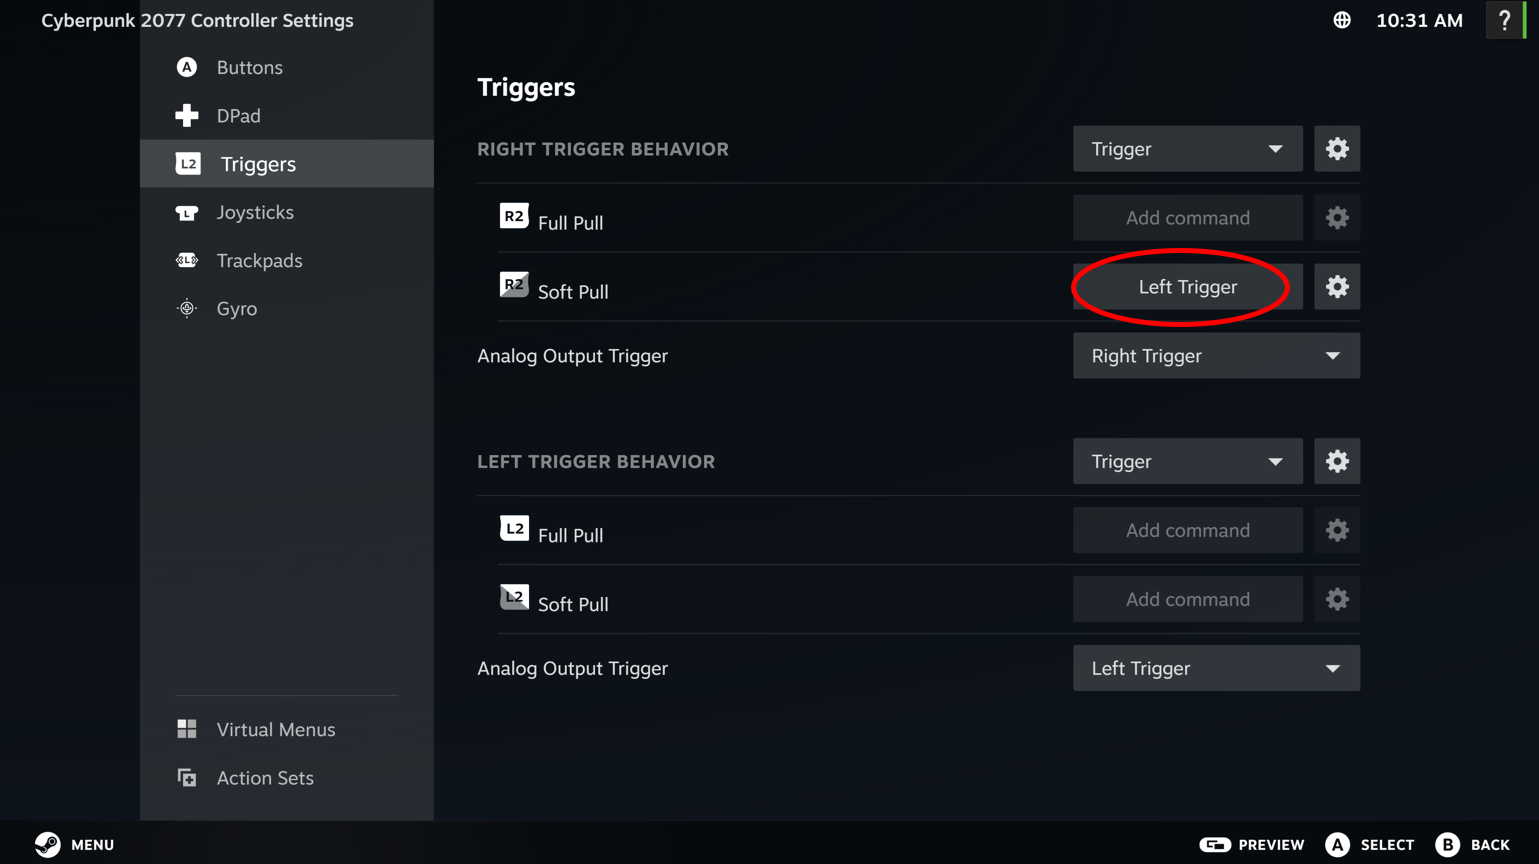
For the Steam Controller, the default trigger settings will be set to work as a normal analog trigger. To get extra utility out of your triggers, you can add inputs for:
-
Full pull – a pull of the trigger that fully bottoms out
-
Soft pull – a pull of the trigger that does not fully bottom out, the threshold is adjustable by clicking on the gear next to the behavior drop down

An example of when this could be beneficial is to use a soft pull to aim down the sights and then full pull to shoot in an FPS. In what is shown below, when partially pulling the right trigger, the left trigger will activate, which will cause the character to aim down sights. Once the right trigger is fully pulled, it will fire.
For the Steam Controller, the default joystick settings will be set to work as a normal joystick with click.

To get extra utility out of your joysticks, you can add inputs for:
-
Touch – the thumbstick has a capacitive sensor in it and will sense when you touch it, you can use this to have it send a command like a button press. Commonly used to activate Gyro.
-
Outer Ring Command – this will assign a command to activate when the thumbstick is deflected far out towards the edge. For example, you can map Outer Ring Command on left thumbstick to Left Stick Click to make your character sprint when you fully deflect the thumbstick (see example below)

In the Joystick behavior settings menu (gear) you will find many ways to adjust the Joystick behavior including sensitivity, axis inversion, deadzones, and more.
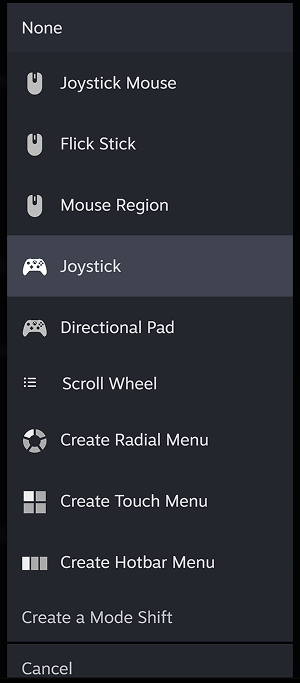
In the Joystick behavior drop down, you will find many other alternate behaviors for the Joystick, which we will go into much further detail with a later post.
-
None – the Joystick will be turned off
-
Joystick Mouse – set Joystick will emulate a mouse, where the deflection of the joystick will determine the speed of the mouse motion in that direction
-
Flick Stick – turns a deflection of the Joystick into a rapid, predetermined amount of pixel rotation. Typically used for rapidly turning around (180 degrees) in competitive games, or large scale adjustments when using another input for fine aiming (trackpad or gyro)
-
Mouse Region – set the Joystick to emulate a mouse, but only in a circular subsection of the full screen. This can be useful if a game you are playing has a key UI HUD located in the same place the whole game.
-
Joystick – the Default
-
Directional Pad – sets Joystick to be a configurable DPad
-
Scroll Wheel – set the Joystick to send a command when rotating it clockwise or counter clockwise. Great way to emulate the scroll wheel on a mouse to zoom in and out in a RTS game.
-
Create Radial Menu – the Joystick will pop up an on screen menu over the game that can be customized to include whatever output you like.
-
Create Touch Menu – similar to Radial Menu, except it provides selections in a grid format.
-
Create Hotbar Menu – creates a virtual hot bar, deflect the joystick down to bring it up, deflect right or left to cycle through options and then deflect up to select the item.
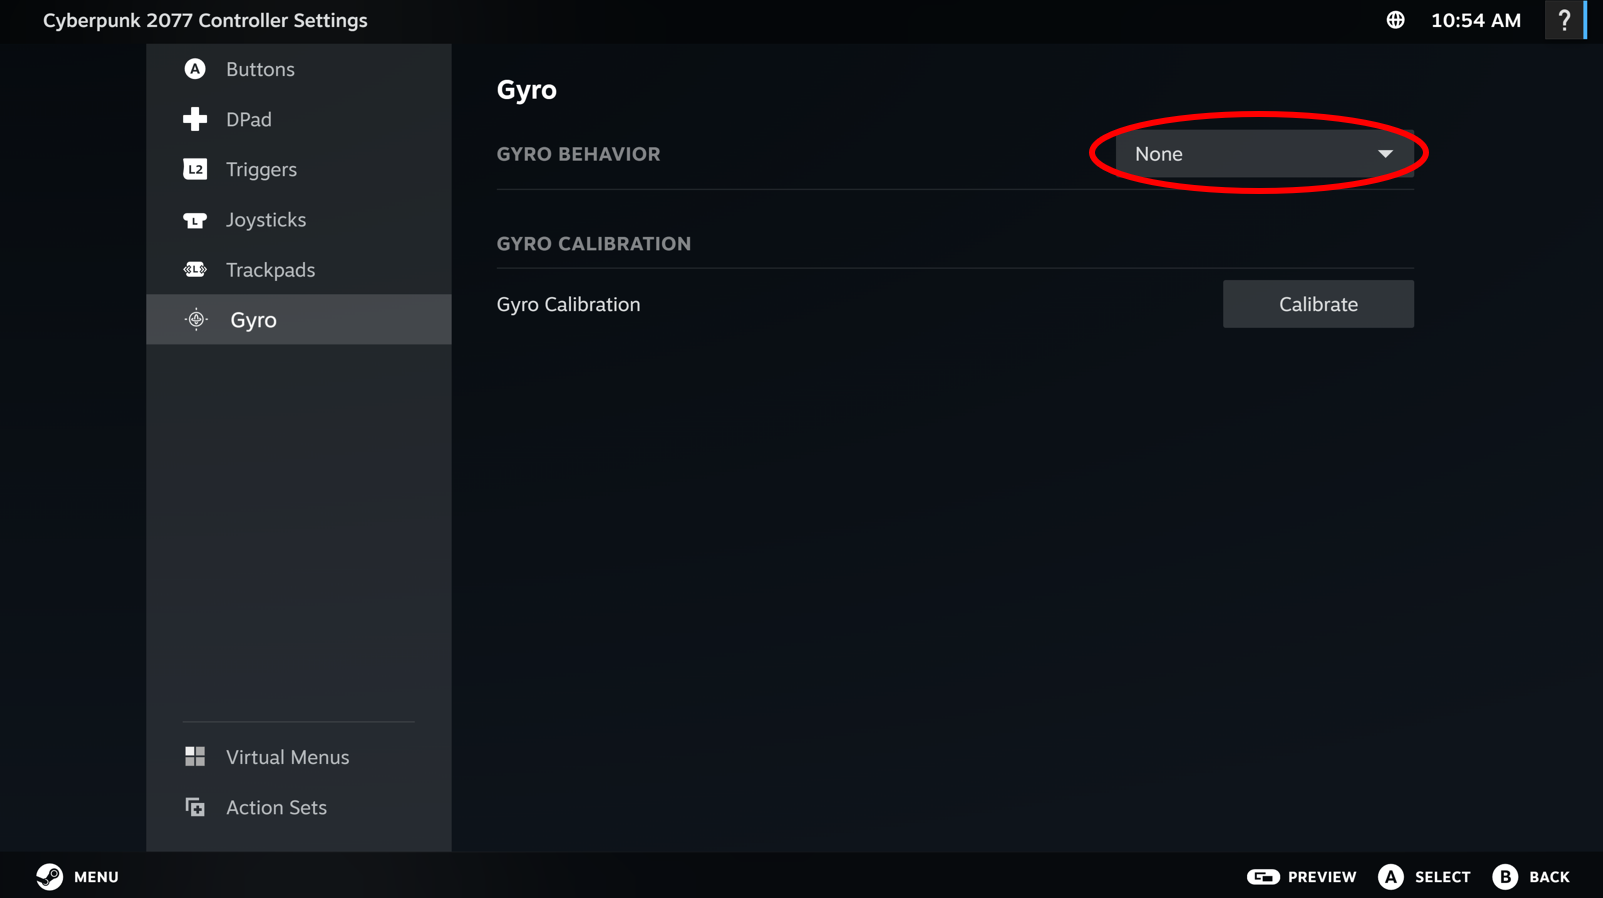
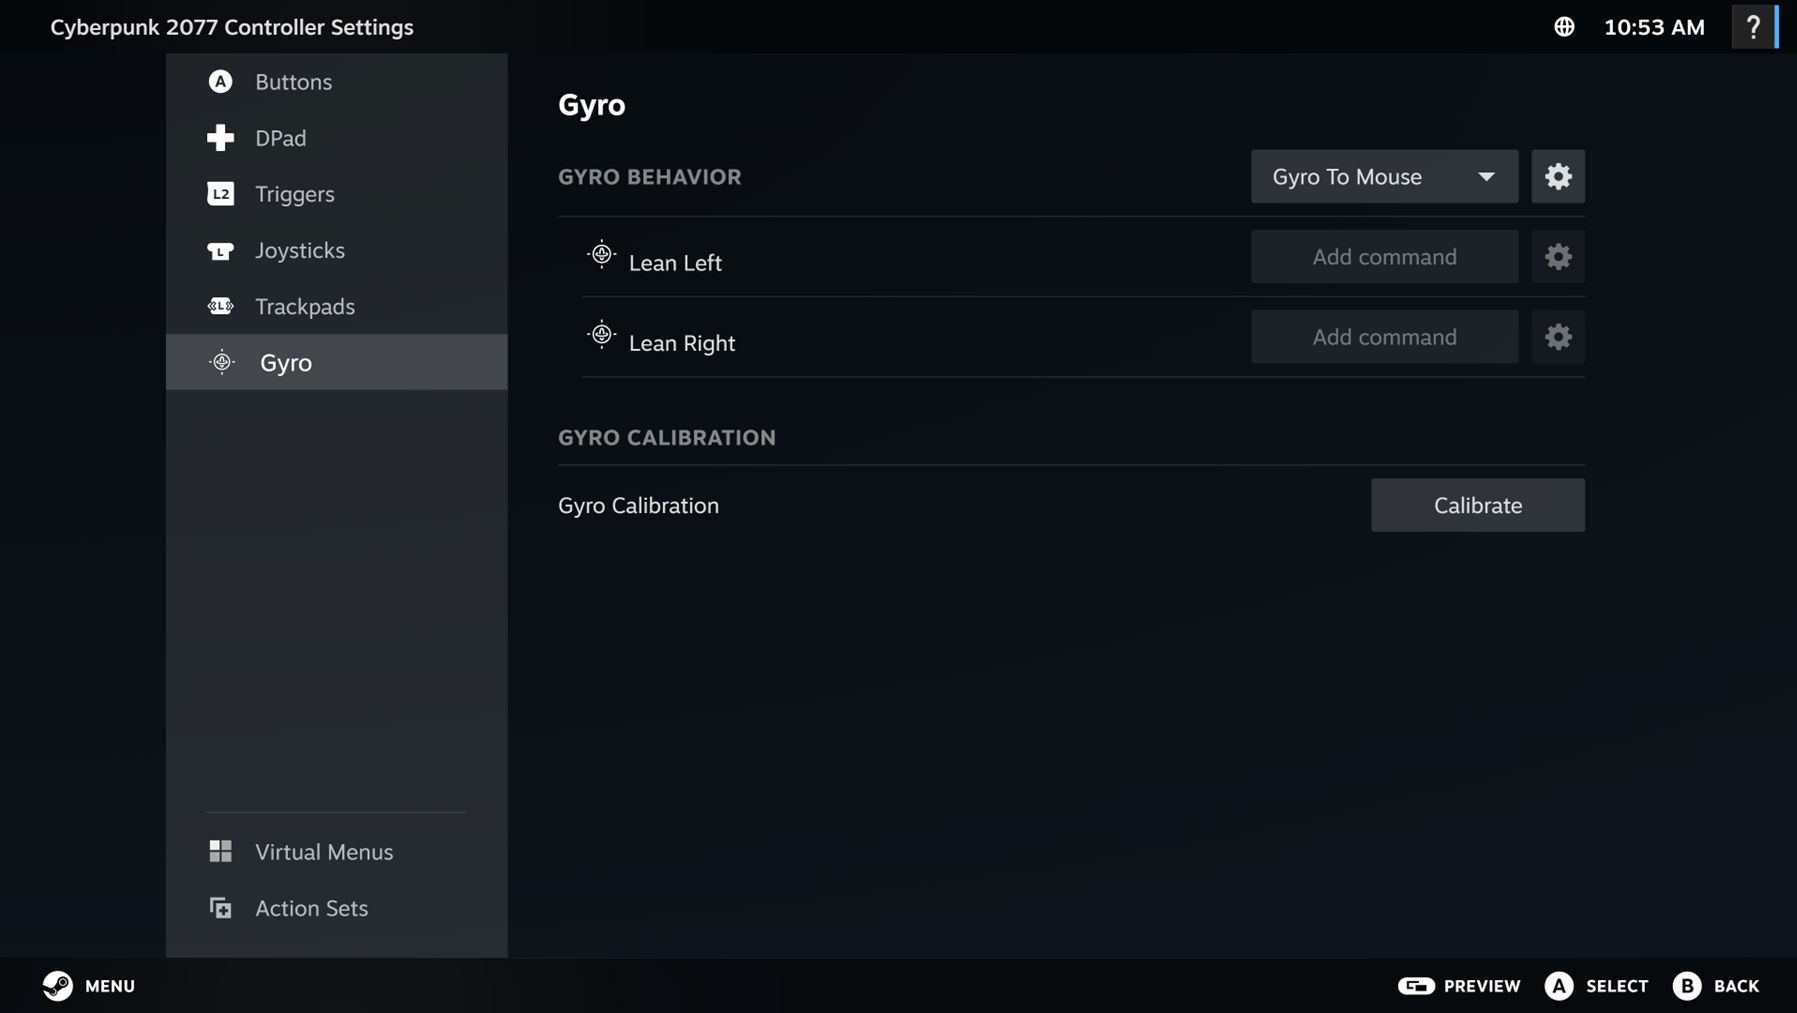
Gyroscope control allows you to move the controller physically as an input. Think turning the controller left/right to steer a car, you know, like you used to do as a kid, nearly making yourself fall off of the couch. For the Steam Controller, the default Gyro will be set to off, unless a game specifically activates it. Like Joystick, there are many behaviors for the Gyro. In this article, we will only discuss the Gyro to Mouse behavior as well as some key adjustments you could make to improve Gyro to Mouse performance. The rest of the behaviors will be covered in a “How to make the most out of Gyro” deep dive. To enable Gyro to Mouse, click the behavior drop down and select Gyro to Mouse.
Click on the behavior settings (gear next to “Gyro To Mouse”) to enter the Gyro to Mouse settings menu. You will see many options on this page, for this brief overview, we will focus on the critical items.
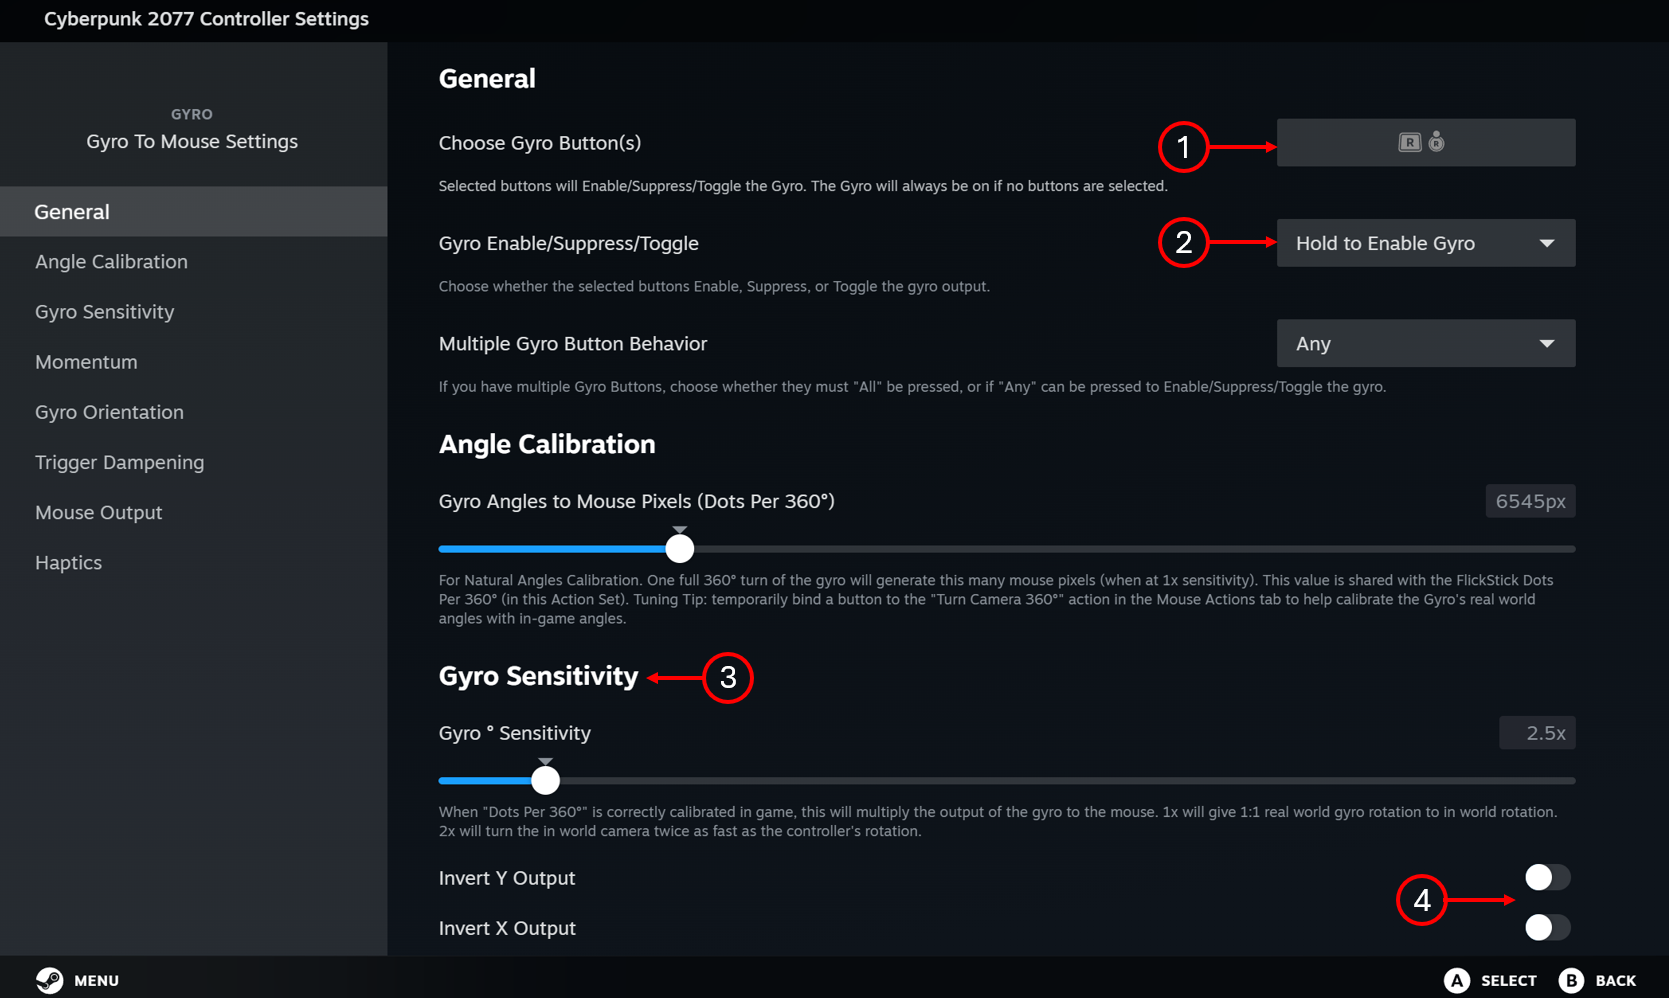
-
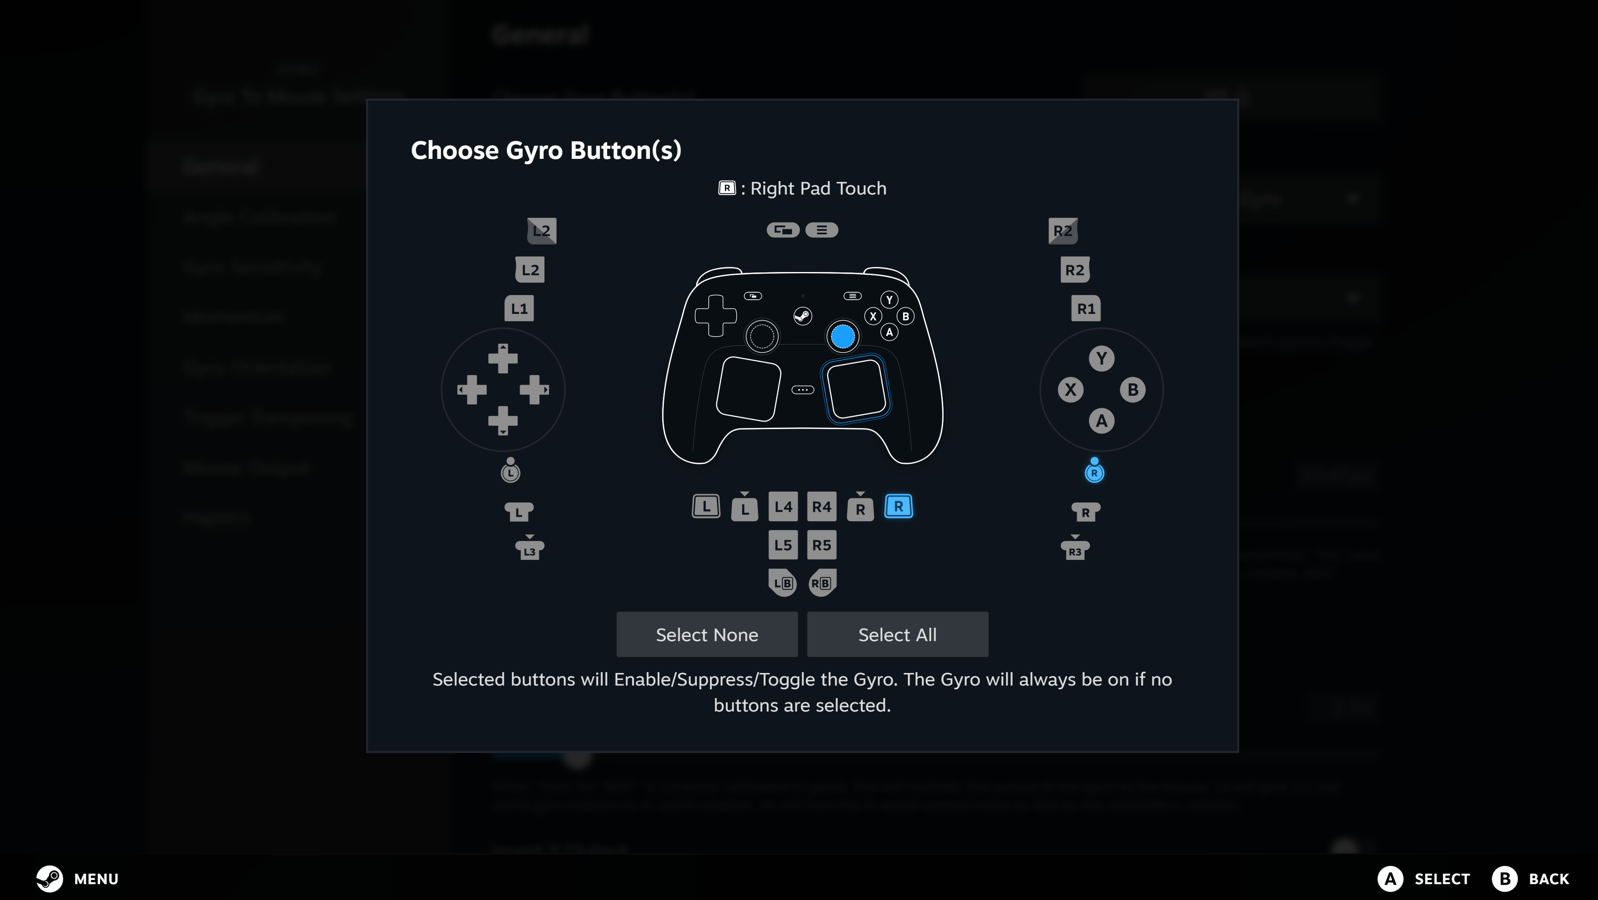
Choose Gyro Buttons – this is the button that will enable/disable gyro when pressed down. By default it is set to the touch sensor in the right trackpad and the touch sensor in the right thumbstick. As long as your finger is touching one of those things, the gyro will be enabled. Click in the box to see a list of many possible options (see image below this list)
-
Gyro Enable/Suppress/Toggle – by default the button you chose for item 1 will turn Gyro ON while the button is activated. You can set it to Suppress – meaning Gyro is always on UNLESS the button is currently activated. Or you can set it to Toggle, which will switch Gyro from on to off (or vice versa) on an activation.
-
Gyro Sensitivity – the higher the value for sensitivity, the more mouse motion you will see for a given controller physical movement. Adjust this if you think you need to move too much (or too little) for the resulting in game motion.
-
Invert Y/X Output – toggle these to invert your output.
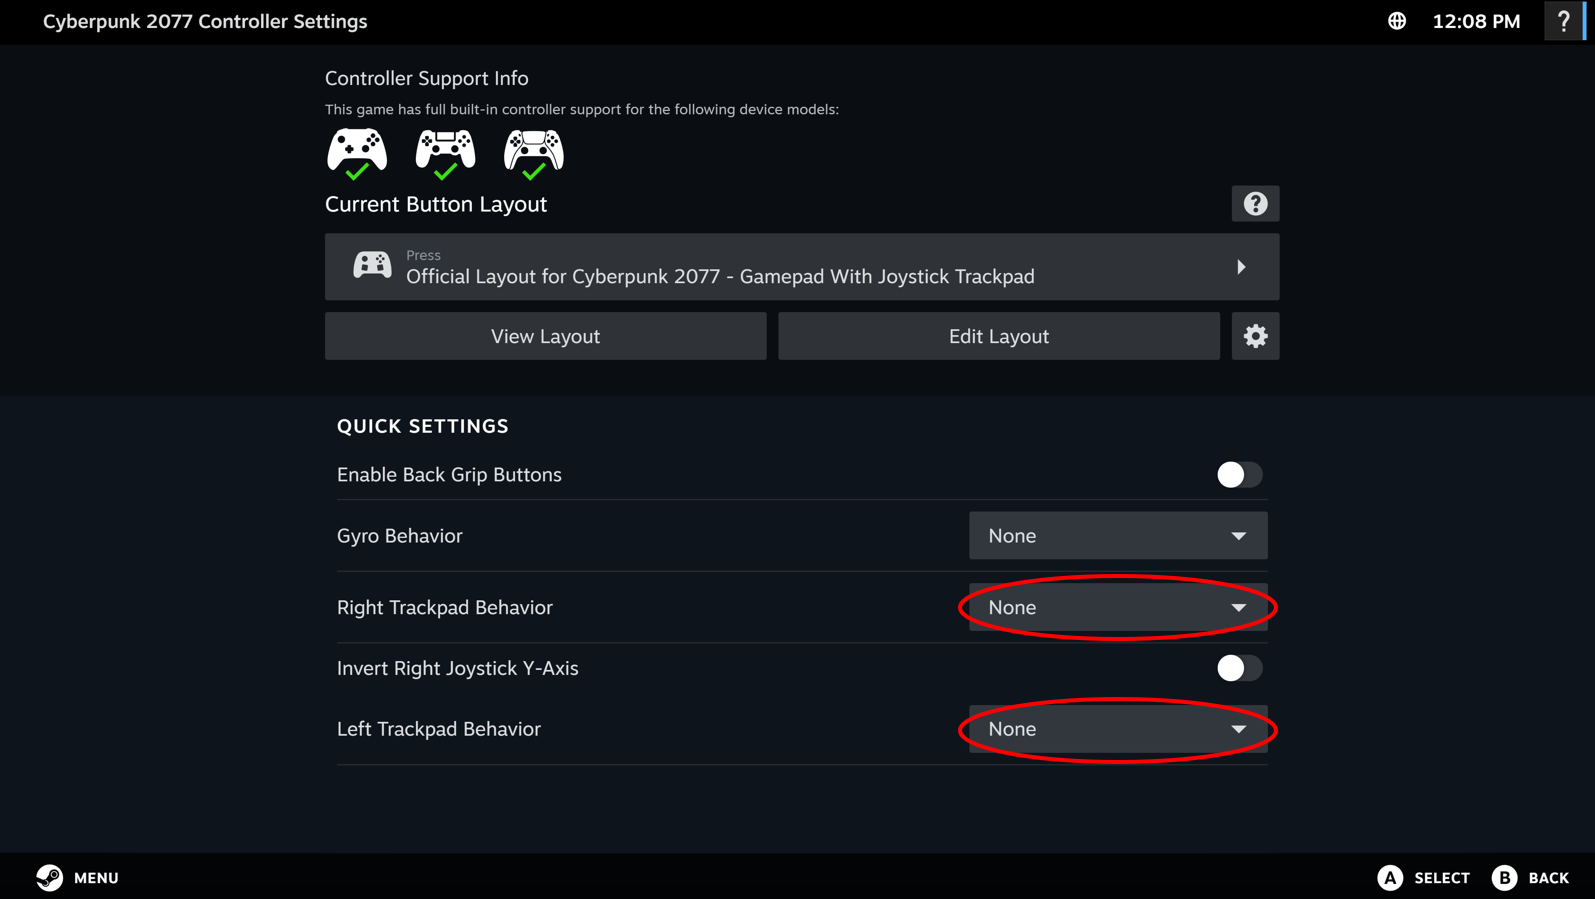
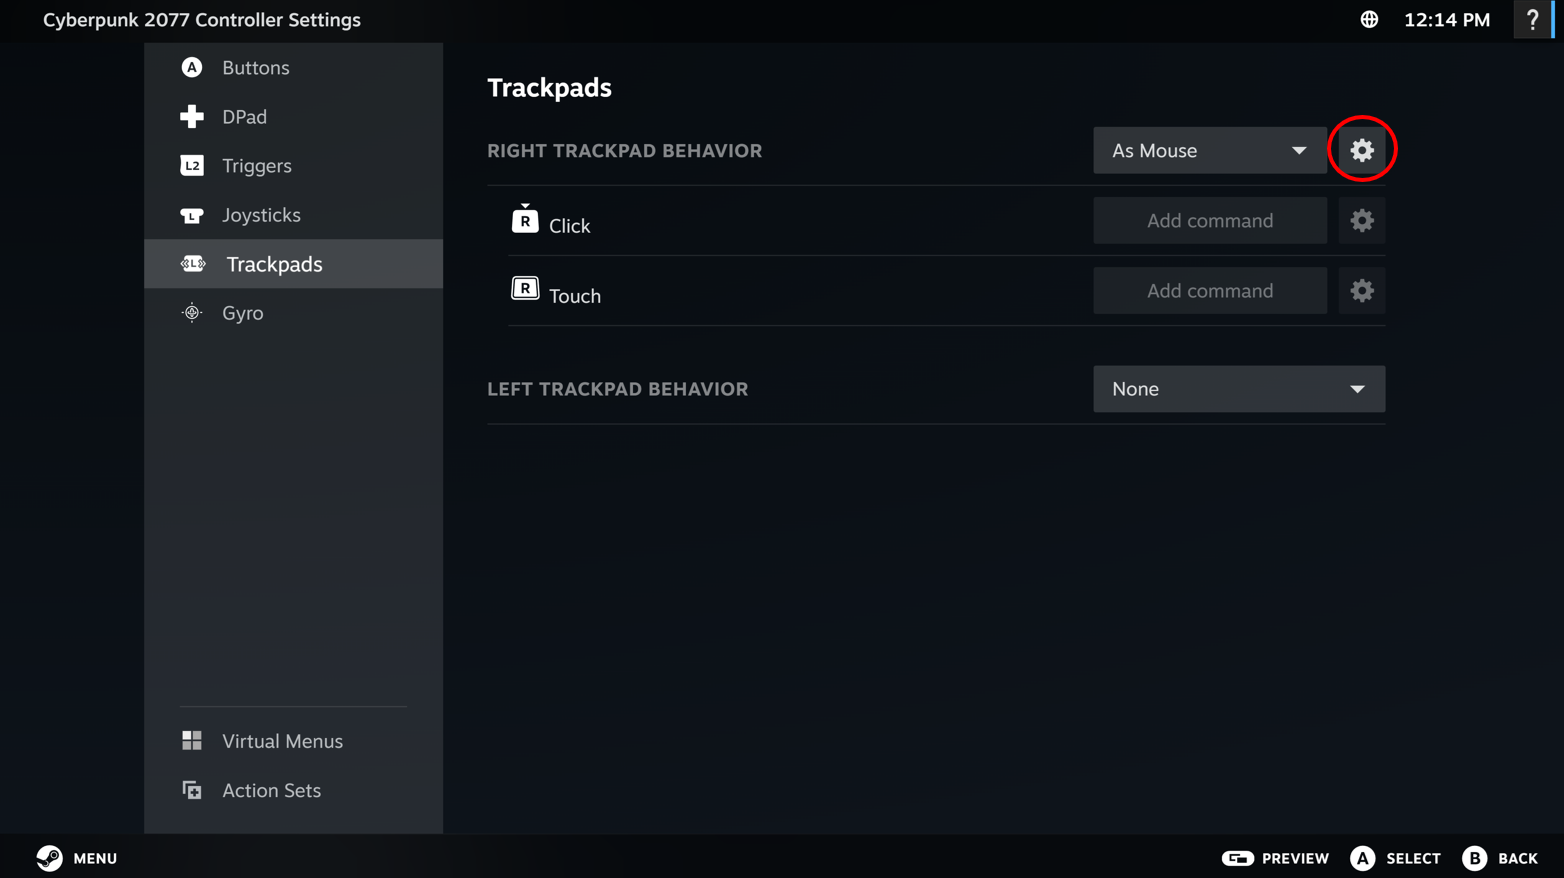
Like Joystick and Gyro, Trackpads provide a ton of powerful input behaviors, most of which we will highlight in a “How to make the most out of Trackpads” article. For the Steam Controller, Trackpads will be defaulted to whatever is selected by the developers. Typical defaults are “None”, “As Mouse”, “Joystick”, “As Joystick”, and (for left trackpad specifically) “Directional Pad” so we will focus on those for this article. To change Trackpads to one of these behaviors, you can either select the drop down on the Quick Settings section of the Configurator home screen, or you can navigate into Edit Layout like other buttons and modify it there.
Quick Settings of the Configurator Home Screen:
Edit Layout screen:
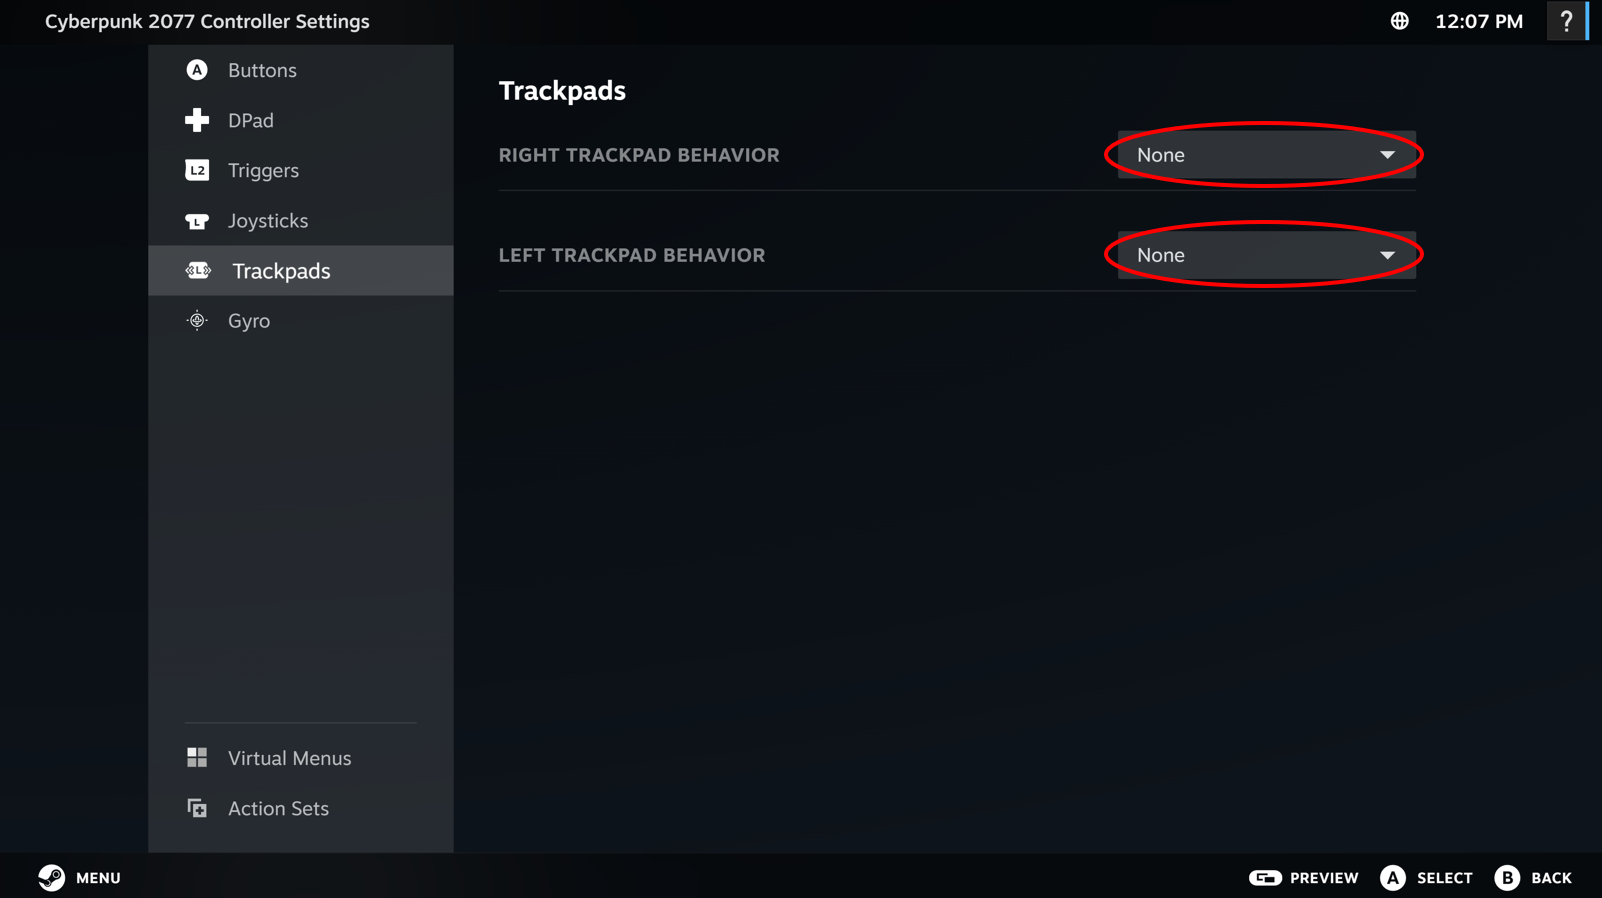
Note: if you select the drop down in the Quick Settings section of the Configurator home screen, you will only see a subset of possible trackpad behaviors. Please go to the full Layout Editor to see all options if there is something you cannot find in Quick Settings.
-
None – The Trackpad is off
-
As Mouse – The Trackpad will emulate a mouse, like on a laptop, but more responsive. Note: If you select “As Mouse” and the game you are playing begins flashing controller glyphs and keyboard glyphs rapidly, or even crashing, please try “As Joystick” (see below).
-
Joystick – the trackpad will emulate a joy stick, touch the top part of the trackpad and the output will be like a fully deflected thumbstick pressed up.
-
As Joystick – the trackpad will emulate a mouse, but provide an output like a thumbstick. Great for games that do not handle mouse input and gamepad input at the same time.
-
Directional Pad – the trackpad will emulate a DPad. You can set each direction of the trackpad to whatever output you want, but default is the DPad directionals.
As Mouse
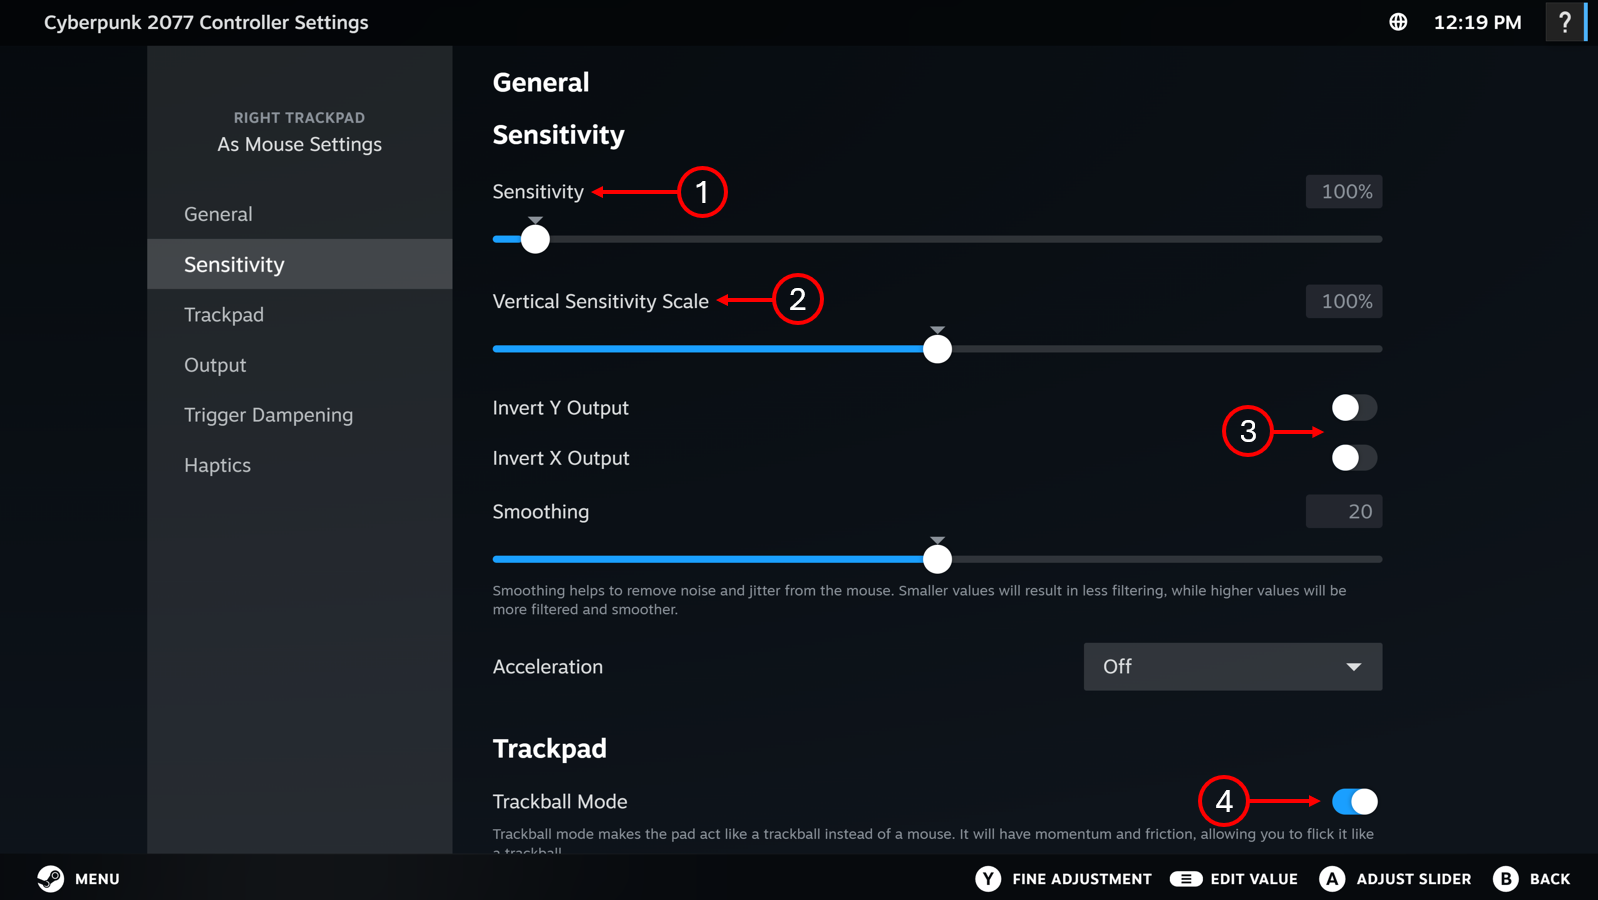
Selecting “As Mouse” for trackpad behavior will allow you to set a command for clicking the trackpad (full press) and touching the trackpad (just resting your finger on it). The defaults for these two are unbound, feel free to add whatever you’d like. We will quickly highlight a few settings that may be immediately helpful. Click the behavior setting gear to access the settings menu for Trackpad As Mouse:
-
Sensitivity – the higher the value for sensitivity, the more mouse motion you will see for a given swipe on the trackpad. Adjust this if you think you need to swipe too much (or too little) for the resulting in game motion.
-
Vertical Sensitivity – Changes the sensitivity ratio between horizontal and vertical motion on the trackpad. In most FPS games, you can turn horizontally forever, but vertically only until looking fully up or down. Because of this, you might prefer much more sensitivity on the horizontal axis than the vertical axis.
-
Invert X/Y output – toggle these to invert your output.
-
Trackball Mode – in trackball mode, when you swipe and let go, the swipe will have momentum (like a ball rolling) and will continue to move the mouse in that direction for a while. If you prefer the mouse to stop as soon as you release your finger, turn this off.
As Joystick
“As Joystick” is a great way to get similar behavior to “As Mouse” in games that do not allow simultaneous gamepad + mouse/keyboard input. If you’re seeing weird behavior (flickering glyphs, input not working, etc.) in a game when your trackpad is set to “As Mouse”, try “As Joystick” instead. In the behavior settings menu you will find similar ways to fine tune the trackpad.
Once you have a layout you like, it will remain applied for that controller/game combination unless you modify it or apply a new layout. If you use a new type of controller, it will revert to the default as well. You can save that layout so you can reapply it later on a different computer, Steam Machine, etc for this game. You can also export it so that you can use it on any game. Finally, you can export it for the community to use as well. To do any of these things, open up the export menu by clicking on the gear icon in the Button Layout section.

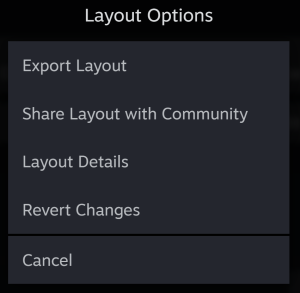
This will open the layout options menu
-
Export Layout – this will bring you to a menu focused on saving the layout for personal use
-
Share Layout with Community – this will bring you to a menu focused on publishing the layout for the community to try out!
To save the layout for personal use, click “Export Layout”. The Save New Layout menu will open up
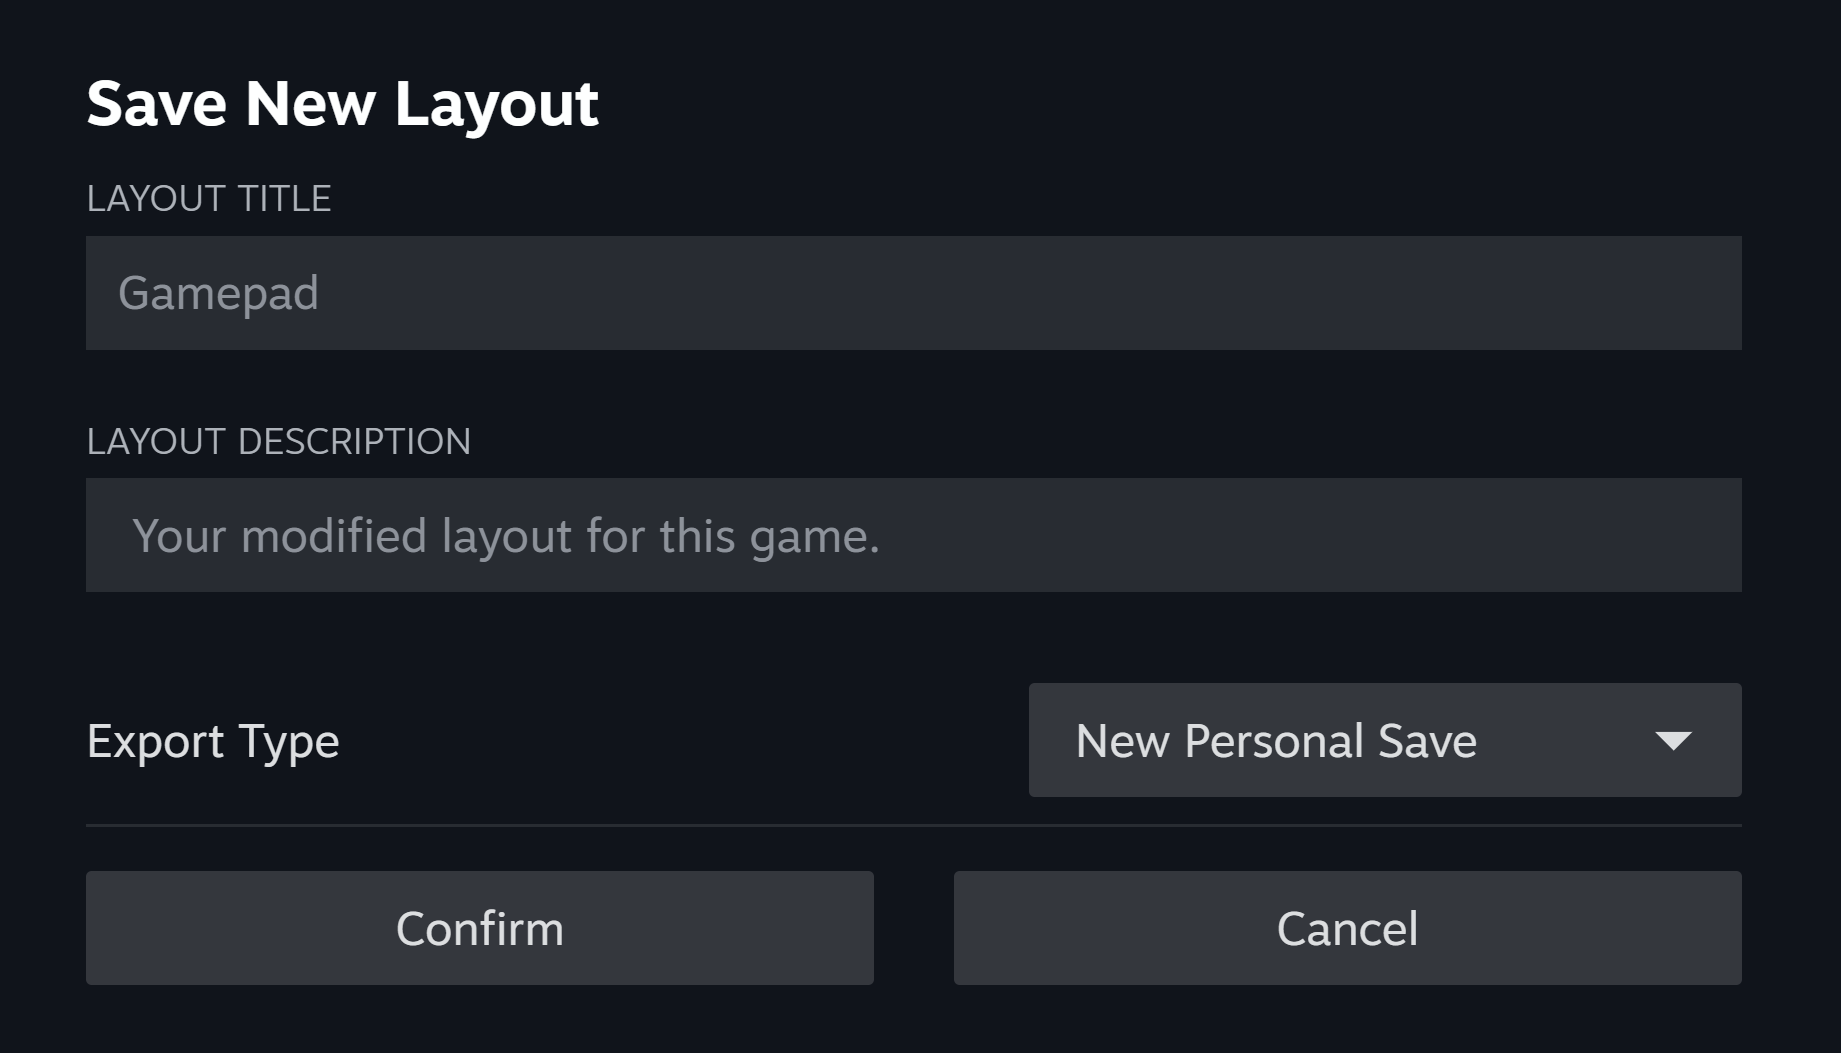
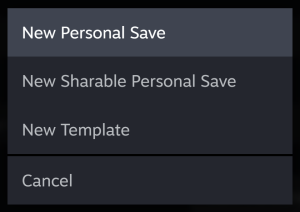
Here you can give the layout a name and a description. There are a few different export types which you can access by clicking the drop down:
-
New Personal Save – this will save the layout for THIS game. Use this when you are saving a layout that is really only appropriate for the current game (like down + attack for Hollow Knight: Silksong being mapped to one button)
-
New Shareable Personal Save – this will save the layout for THIS game and generate a link for you to directly share with others. You can access that link by clicking on Layout Details within the Layout Options menu and send to friends to use. It is not searchable and only those with the direct link will be able to use the layout. (Note: if you want the layout to appear for all steam users and be searchable, use the Share Layout with Community option in the Layout Options menu)
-
New Template – this will save this layout to be used with ANY game. Use this when you’ve created a template for general controller use. For example, if you’ve found a trackpad mode you really like that apply for most deck builders, use this option.
To share your layout with the community, click on “Share Layout with Community” instead of “Export Layout”. The Save New Layout menu will look identical except the “export type” drop down will be removed. Fill out the information and confirm to upload to the Steam Layout database.
Learn more about Steam Controller on its product page, and keep an eye on the Steam Hardware Blog for future how-to guides and closer looks. We also have this video on our official YouTube channel that takes you on a quick-start tour of Steam Controller.